
Shaker cabinets are a modern take on the classic style. When building a custom kitchen, it is a very desirable look. Below is a guide that will help you achieve the perfect shaker look.
So you want your kitchen to look amazing. But one thing is holding you back… aligning your cabinet door hinges! It’s a super common problem and it can be very frustrating when you don’t know how to correct it. Luckily, I’ve figured out a useful strategy to help make this process much easier. Let’s get started!

How to align cabinet doors with exposed hinges
Cabinet door hinges are one of the most common parts in a home. They are used to connect the cabinet doors to their frame. They are also known as butt hinges, because the hinge pin fits into corresponding holes on each side of a door or drawer front. Hinges come in many forms, including: flush, self-closing and non-swinging.
Adjusting Door Hinges
Once you have chosen the correct size for your project, you can use a screwdriver or wrench to adjust them. The following steps will help you make sure that your door is aligned properly:
1. Open and close the door slowly while watching it carefully until you see where it needs adjustment. This may take some time, so be patient!
2. Raise the hinge slightly with your screwdriver or wrench until you see where the gap is at its widest point. Mark this spot with chalk so that you know how much further up the hinge must go before it will close correctly without hitting against something inside the cabinet or jamb (the part of your wall where the door swings open).
How to adjust door hinges on a cabinet
Door hinges are the simplest and most common type of hinge. They’re used to hang doors on cabinets, wardrobes and other furniture. Adjusting door hinges on a cabinet is a job that requires little skill or experience, but it’s important to do it correctly to avoid damaging the cabinet or creating an unsafe situation.
The first step in adjusting your door hinges is to remove the old ones from the cabinet. You can use a flathead screwdriver to pry off any existing screws that are holding them in place. If they don’t come off easily, there may be more screws underneath where you can’t see them — but this shouldn’t be too much of a problem if you’re careful not to force anything.
Once all the existing screws are removed, attach new door hinges using new screws and washers provided by your hardware store (or with your new hinges). Make sure they’re as level as possible before attaching them securely by tightening all of the screws equally on each side of each hinge until they hold fast without any play from side-to-side movement or up-and-down movement (if there’s too much play here, try tightening down hard
The first step in installing exposed hinges is to line up the hinge with the edge of the door. This will help you determine how far down to set the hinge screws.
Use a ruler or tape measure to mark where each hinge will go. Then use a drill bit that’s slightly larger than the screw head on your hinge to create holes for the screws in your cabinet door. Make sure that these holes are placed so that they’re centered on the width of your door. This means that if you have a two-inch wide door, you should make your holes 2 inches apart from each other.
When installing exposed hinges,it’s important to make sure that they’re level with each other and flush with each side of your cabinet door frame. You can achieve this by using a level as well as measuring from one side of the exposed hinge to another (see photo above).
It is a great way to give your kitchen or bathroom a more modern look.
If you have ever installed cabinets with exposed hinges, you know that it can be a difficult task. It’s not as simple as just installing the hinges and hanging the doors on them!
The first thing you need to do is make sure that your cabinet is level and square. You can do this by using a bubble level or by measuring from corner to corner for the same distance on each side of the cabinet. If one measurement is different than another, make adjustments until they are equal. If your cabinets aren’t level from side-to-side or top-to-bottom, then your doors won’t hang straight either!
After making sure that everything is square and level, remove all of the existing door hardware from your cabinets and replace them with new ones that match the style of your kitchen or bathroom. Then replace all of the hinges too!
Next, measure from the top edge of each hinge down to where it meets up with its corresponding door jamb (or cabinet frame) on each side of
A pair of exposed hinges is a classic detail that can add a touch of elegance to your kitchen. Installing them is an easy project, but it does take some time.
Here’s how to hang cabinet doors with exposed hinges.
Tools and Materials
Screwdriver (electric)
Hammer
Stud finder
Level
Tape measure
Hinge screws, 4″ long (3/8″ diameter) and 1/2″ wide (for 3/4″ doors) or 5″ long (1/4″ diameter) and 1/2″ wide (for 1-1/4″ doors)
Adjusting cabinet door hinges is a simple process that can be completed in a few minutes. The first step is to identify the type of hinge you have on the cabinet. There are three different types of hinges available: standard, self-closing and exposed.
Adjusting wardrobe door hinges is a similar process, but there are some differences between the two types of doors. Adjusting wardrobe door hinges requires you to adjust both sides at once, while adjusting cabinet door hinges only requires one side to be adjusted at a time.
If you’re planning on installing new cabinets or doors, it’s important to check out our guide on how to install cabinets and how to install doors.
How to adjust wardrobe door hinges
If you have a wardrobe or other cabinet with exposed hinges, you can adjust the hinges yourself. It’s simple and requires a screwdriver and a hammer.
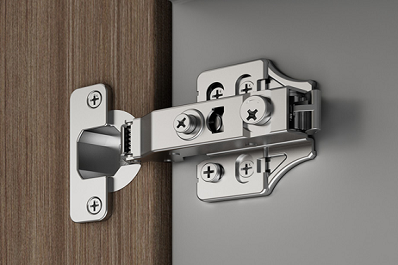
There are two types of cabinet hinges: exposed and concealed. When the hinge pins are visible on the outside of the cabinet, they’re called exposed hinges. Concealed hinges encase the pin in a housing and are installed inside the cabinet.
Adjusting wardrobe door hinges is similar to adjusting any other type of door hinge — but it’s easier because there’s no door frame involved.
Exposing the hinge pin
The first step is exposing the pin by removing one side of the hinge from its mounting plate. This requires removing two small screws that hold each end of each hinge in place as well as unscrewing one side of each hinge from its mounting plate. Use care not to drop any screws into crevices where they may be hard to retrieve later on!
Once both sides have been removed from their mounting plates, you should see some kind of retaining mechanism for each pin (a collar over a screw hole, for example). Unscrew this retaining mechanism until you can see about 1⁄4 inch (6 mm) of each pin shaft protruding from.

Adjusting Cabinet Hinges
If your cabinet door is swinging open, you can adjust the hinges to make sure it stays shut. The first step to adjusting cabinet hinges is to remove the hinge pins from both sides of the cabinet. You’ll need a hammer and a pair of pliers to remove them.
Once you’ve removed all of the screws, use your hammer and pliers to bend back any prongs that are sticking out too far or protruding at an angle that makes it impossible for your cabinet doors to close properly. Once you’ve made these adjustments, replace all of the screws and test out your work by closing and opening each door several times. If there are any problems with alignment or stability, try a different approach until you find something that works well for you.
Wardrobe doors must be hung so they open smoothly and easily without binding on their hinges or bumping into each other when opened wide enough for people passing through them at once (for example, in public buildings).
Installing exposed hinges on a cabinet can be quite tricky. The hinges need to be positioned just right in order for the doors to open and close smoothly. If you don’t use the right type of hinge and don’t install it properly, it will be difficult to adjust or fix.
The first step is to measure the distance between the two sides of the cabinet. This measurement will determine how far apart the screws are placed when attaching the hinges to each side of the cabinet. You can also use a piece of 1/2-inch plywood as a template for drilling holes into each side of your cabinets.
Once you’ve drilled holes in both sides of your cabinet, attach a screw through one hole and into another one on the opposite side of your cabinet. Place a washer on top of each screw and tighten them down with a wrench until they are secure but not so tight that they strip out any threads inside them.
Attach an eyebolt onto one end of your exposed hinge and place it through one hole that leads into another hole on the opposite side of your door frame. Slide another washer onto this eyebolt before attaching an S-hook that attaches to your door handle with another S-hook on its other end
How to Adjust Hinges
Adjusting hinges is not a difficult task. The following tips will help you learn how to adjust your cabinet door hinges.
A hinge has two functions: 1) it allows a door to swing and 2) it holds the door in place when it is closed. To adjust a hinge, loosen the screws holding the hinge in place until they are loose enough for you to move them. Once they are loose, use a screwdriver to turn them in or out as needed. Re-tighten the screws when finished.