
You can build a custom shower pan for your bathroom. The cost to build a custom shower pan depends on the size of the room and the materials you use.
If you want to save money, consider using materials from your local home improvement store. You might also be able to find materials at a salvage yard or local hardware store that are less expensive than those you would find online or at a specialty shop.
If you want to build a new shower for your home, it’s important to understand how much it will cost before you start. This way, you’ll know if it’s worth it or not. Here are some factors that will affect the cost of building a custom shower pan:
Size
The size of your shower will determine how much work needs to be done and how much material is needed. The more space there is in your bathroom, the more likely it is that you’ll need to replace something like an old baseboard heater with something new and updated like an exhaust fan or heater vent cover with lights built into them. These types of upgrades can increase the value of your home when selling but they also help make the space more functional for daily use by improving air circulation or lighting levels by adding extra fixtures such as ceiling
Cost to build custom shower pan
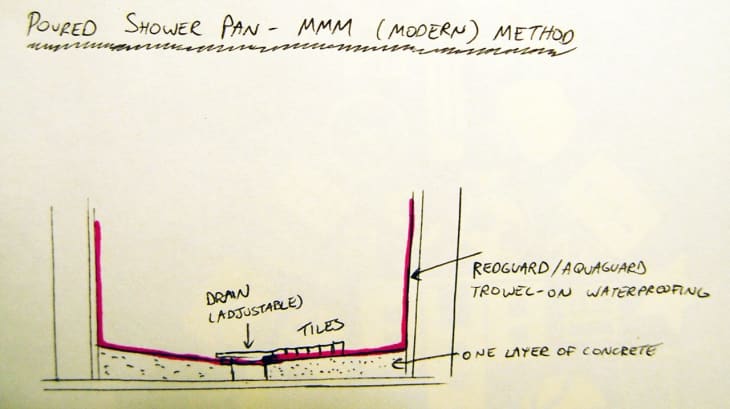
As a home owner, building a custom shower pan can increase the value of your home. It offers a unique look and seamlessly integrates the shower base to your bathroom floor. If you’re a DIY renovator, this tutorial will help you understand the scope of work involved.
What You Need
Materials
- Spec Mix Pre blend Dry Mortar (cement and sand mix) x 2 bags
- Thin-set
- (2) 2×4″x8ft lumber board (to build shower curb)
- 1/2×1″x7ft boards (to use as shower door model)
- Tile and bullnose tile (for shower curb)
- Mosaic tile for shower floor
- Grout
- Tile caulk (matching grout color)
- AquaDefense liquid waterproofing barrier ( Redgard also works well)
- 4″ Screws
- 1″ Nails
Tools
- Chop saw
- Hammer
- Protractor
- Margin trowel
- Level
- Pencil
- Disposable paint brush
- Small foam roller
- Bucket
- Wet rag
Instructions
Plan and Build the Shower Curb
1. You should have your shower enclosure measurements before you start building your shower pan. In my case, I’m building a shower pan for a 40″ neo-angle shower enclosure, which includes 2 glass panels and 1 glass door.
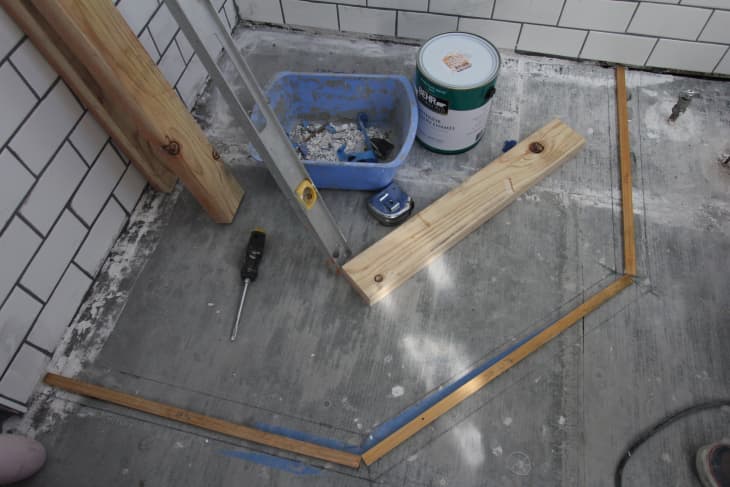
2. Using the 1″x2″ boards, create a model representation of your shower door/panels.
3. Once it looks right, tape the boards down to secure them.
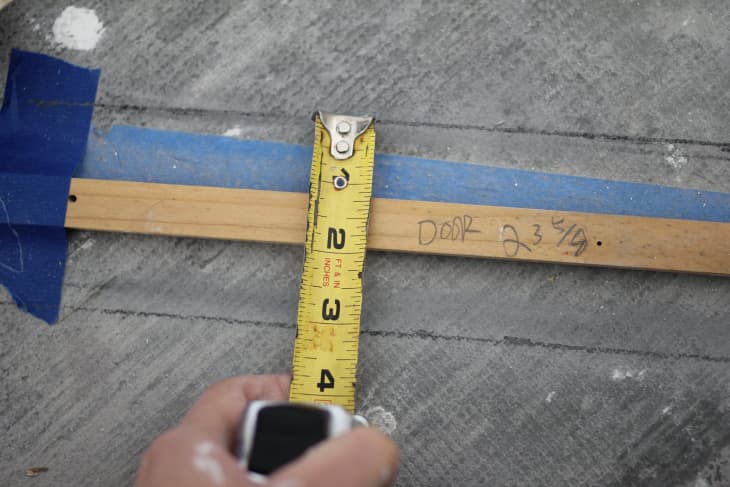
4. The shower curb width should be about 3-4″ wide. Measure and mark the guides so the shower doors sits near the middle of the curb.
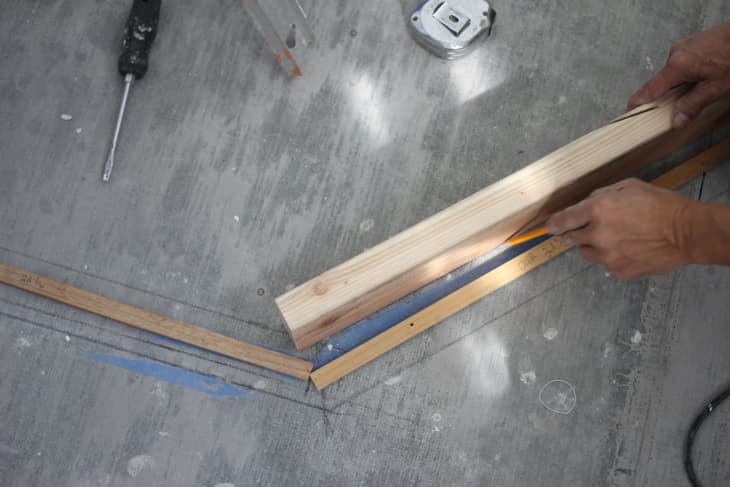
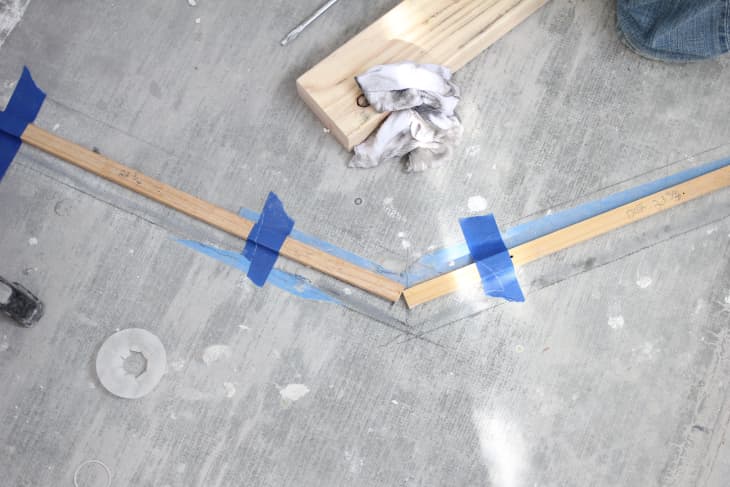
5. Draw the outline of your shower curb. This will be the dimensions of the mold you will build for your concrete curb. Take your 2x4s mark and cut the them to the size of your frame.
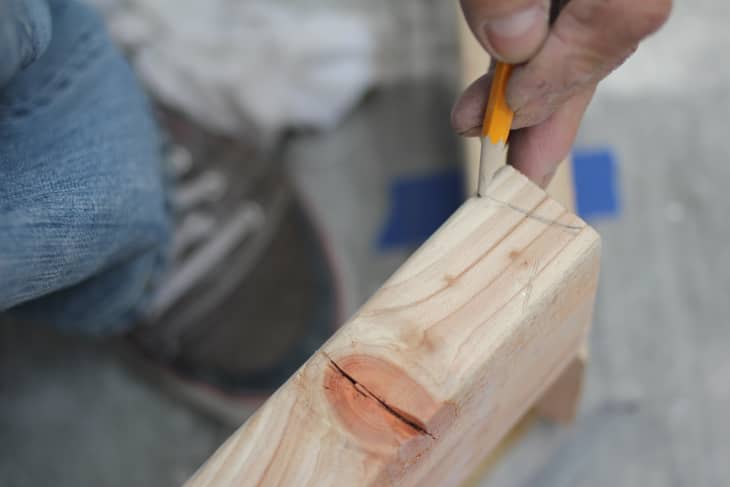
6. Using the protractor, measure and mark the needed angles to cut your inner and outer shower frame. (I haven’t seen a protractor since the 5th grade, so we used an angle guide that came with my laser level.)
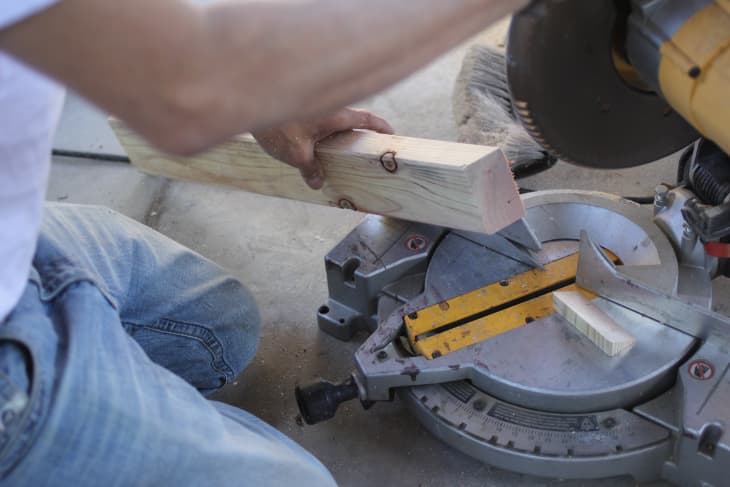
7. Chop the ends of 2x4s to the marked angles.
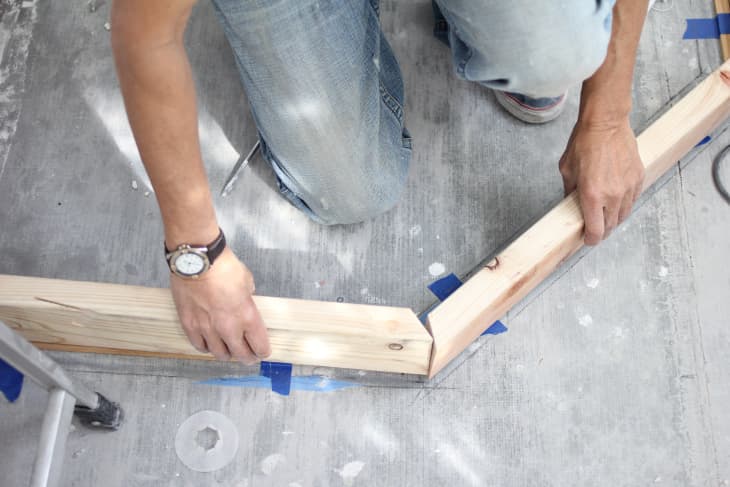
8. Assemble the wooden frame (with both outer and inner edges) for your shower curb.
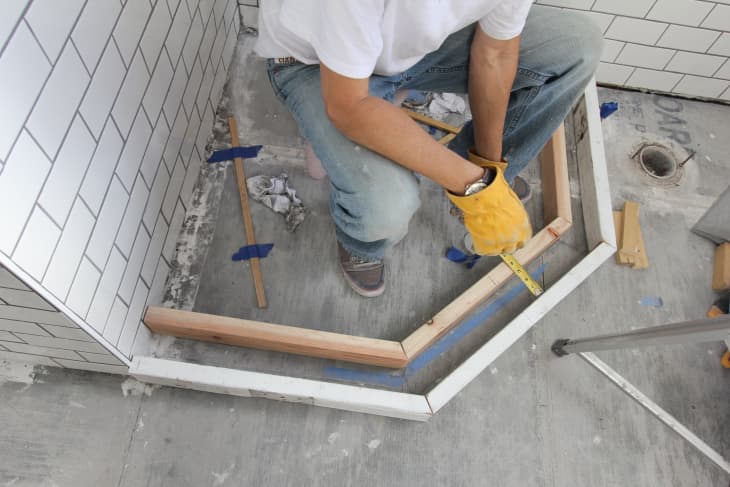
9. Remove the small boards that were taped down. Make sure the width of the curb is still 3-4″.
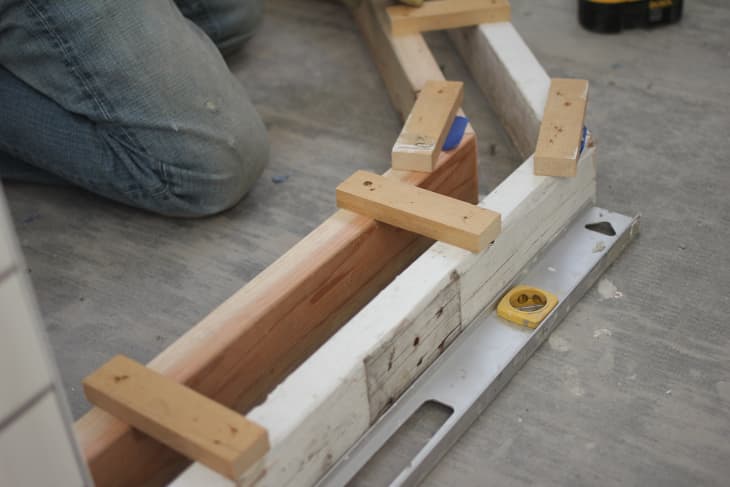
10. Using the small boards, cut, then nail them together to secure your frame.
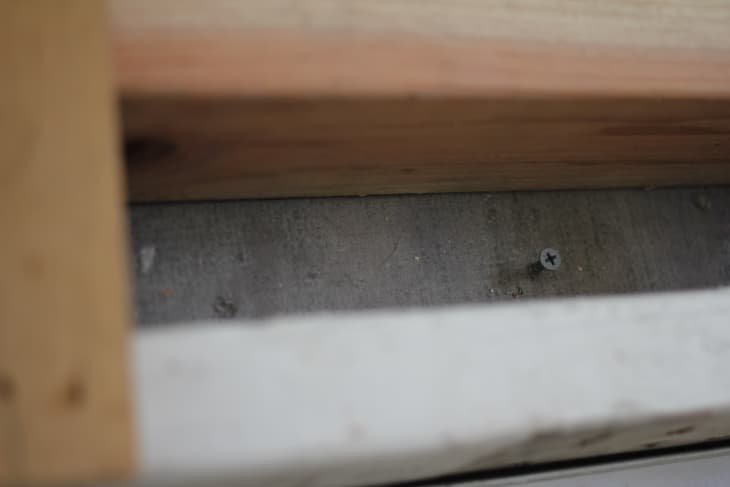
11. Drill screws into the floor (backerboard) at every joint and about every foot. Once the mud is poured and cured, these screws will help secure the curb to the floor.
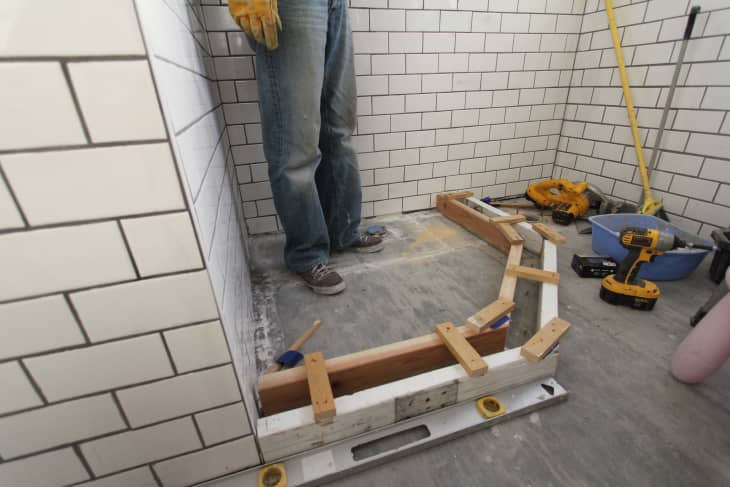
12. Your frame is finished and now is ready for the mud!
13. Mix mortar with water according to label directions.
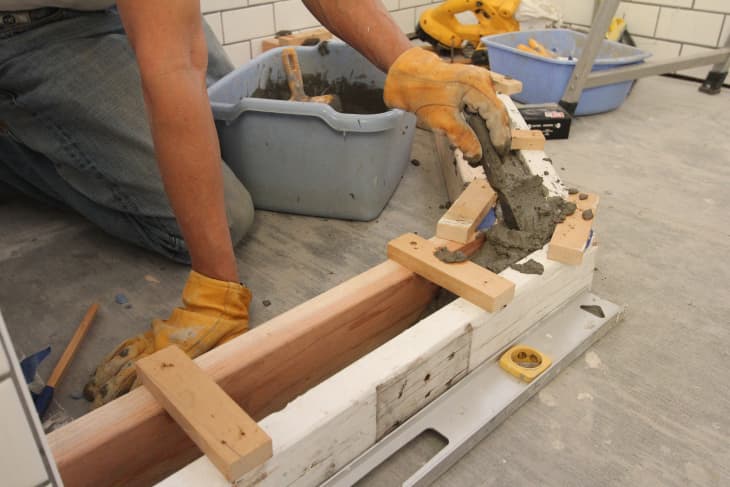
14. Pour in the mud and stir it to prevent air pockets.
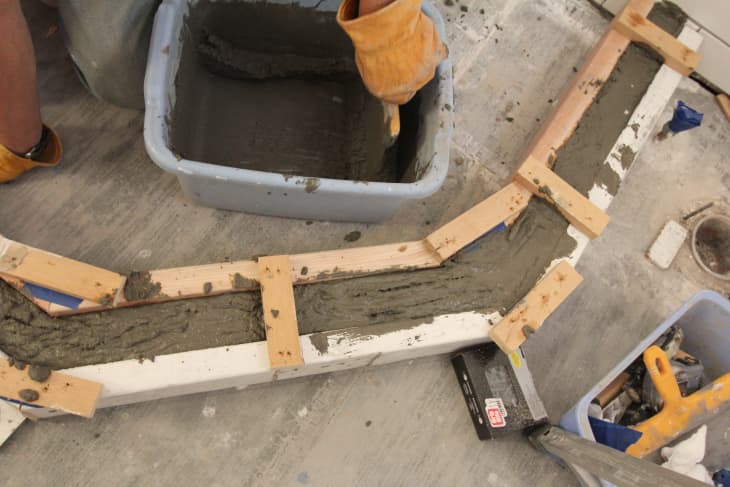
15. Continue filling in the frame until it reaches the top of the 2x4s. Try to make the top as level as possible. The glass shower doors will need to be sitting on a flat leveled surface.
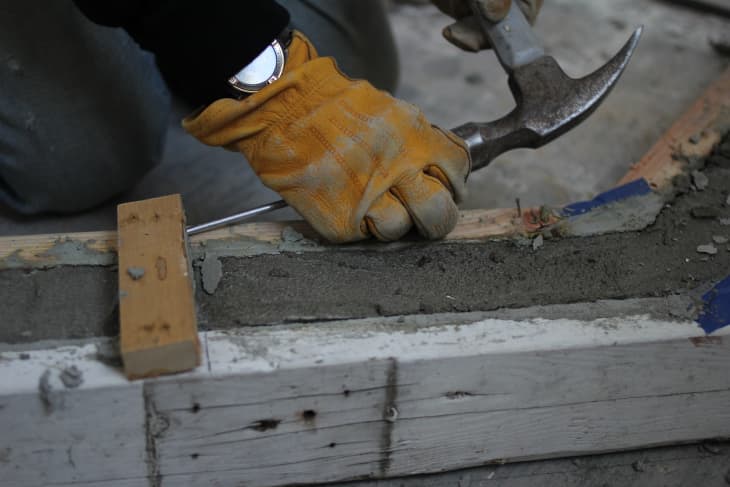
16. After 24 hours, your curb should be hard enough to dismantle the frame.
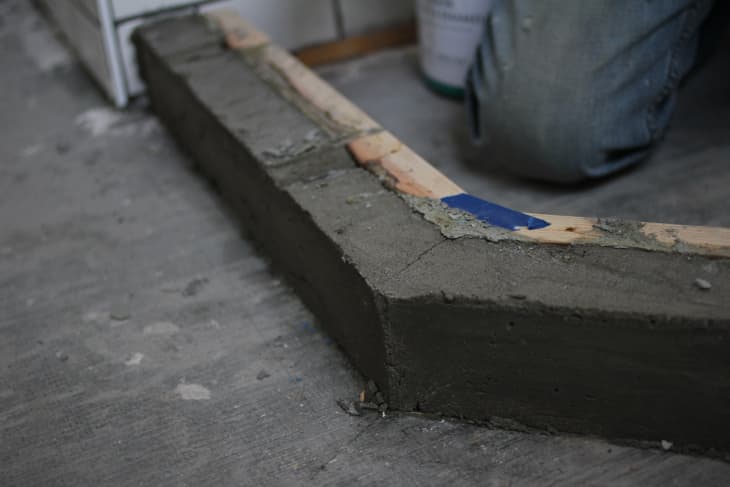
17. Using the drywall knife, even up the edges by scraping off any burrs and imperfections. You also want to place a small level on the width of the curb to ensure the curb is leveled. If needed, use a sander to level the curb.
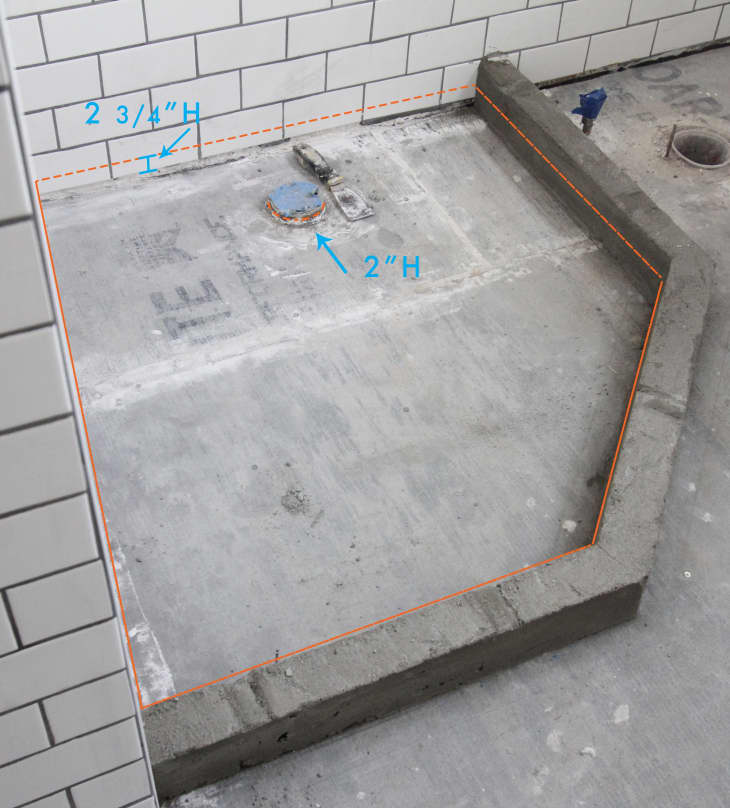
18. The top of your shower drain should be 2″ above the floor. Draw a line along inner the perimeter of the curb and along the shower walls at 2 3/4″ above the floor. This will be your guide of how much mud to pour giving you a 3/4″ slope.
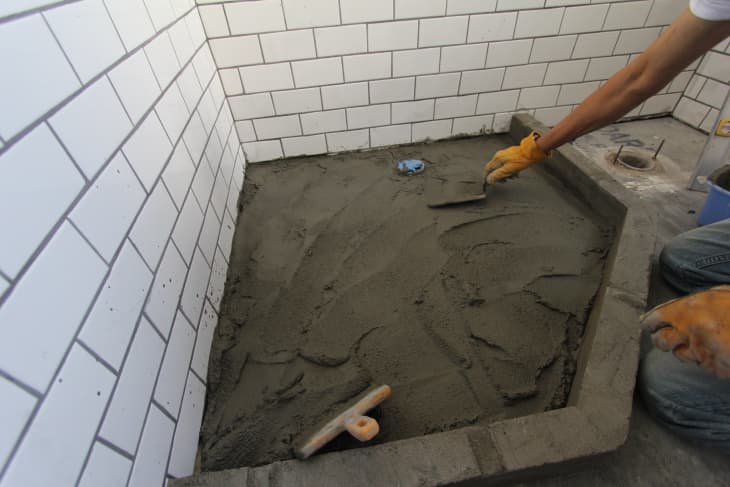
19. Pour mud into the pan. Using the marginal trowel, mix mud thoroughly to ensure no air bubbles.
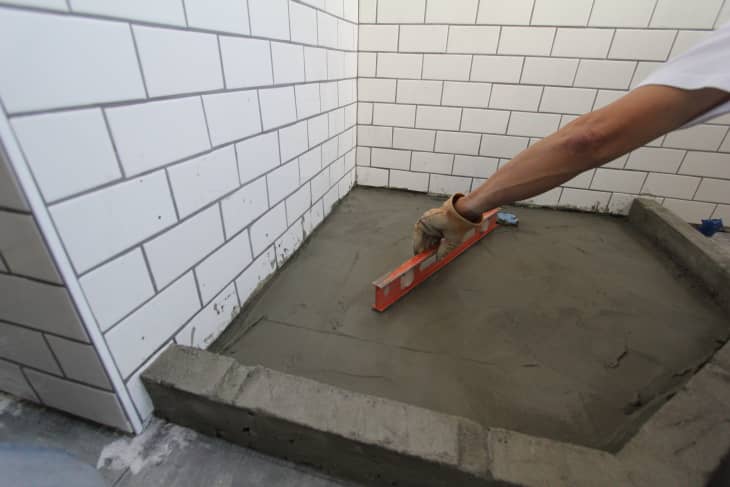
20. Using the level, measure every 5 degrees to ensure all sides are sloping towards the drain.
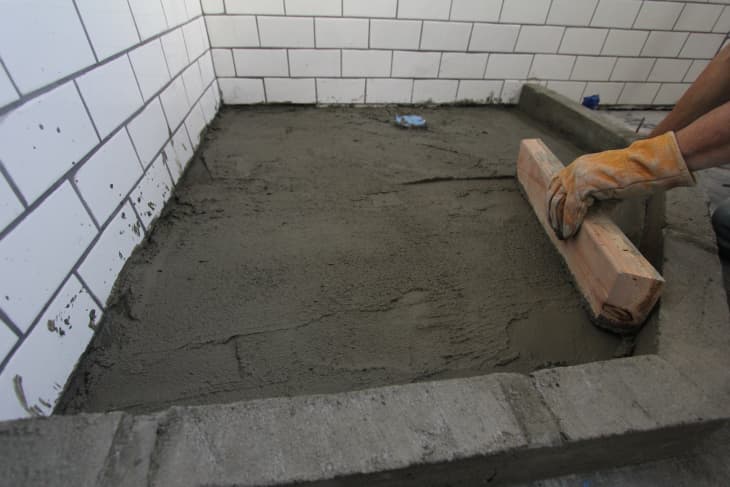
21. Smooth out any cracks or bumps in the shower pan. Add more mud (if needed) to match up with the 2 3/4″guide line then smooth the mud out and once again, using the level to ensure the perimeter is sloping towards the drain. Wait 3 days for the mud to completely cure before waterproofing.
Tip: To ensure there are no cracks, bumps or holes, turn off lights and shine a flashlight horizontally across the floor. You will see shadows if there are any imperfections.
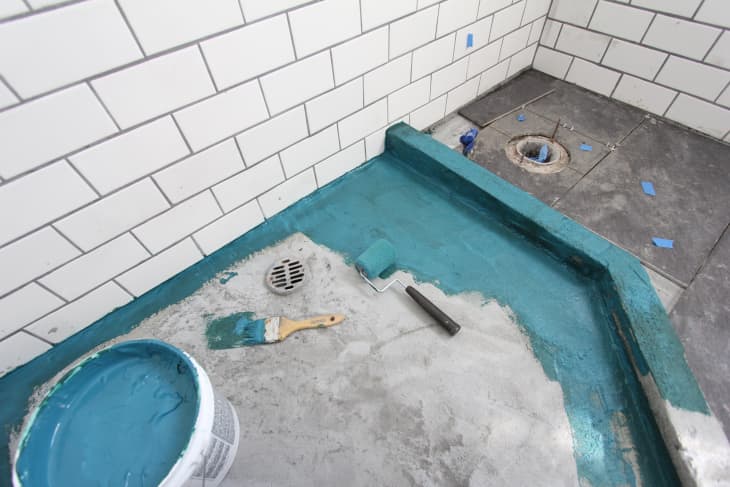
22. After the concrete has cured, it’s time for waterproofing! To waterproof the shower pan, start by painting the perimeter, corners, and nooks with Aquadefense. Allow them to turn from aqua to green first, before applying the Aquadefense to the whole pan. Apply a second coat, making sure to cover any “pinholes” in the process. The combined coats should be about the thickness of a credit card. Wipe any excess waterproofing off with a damp rag.
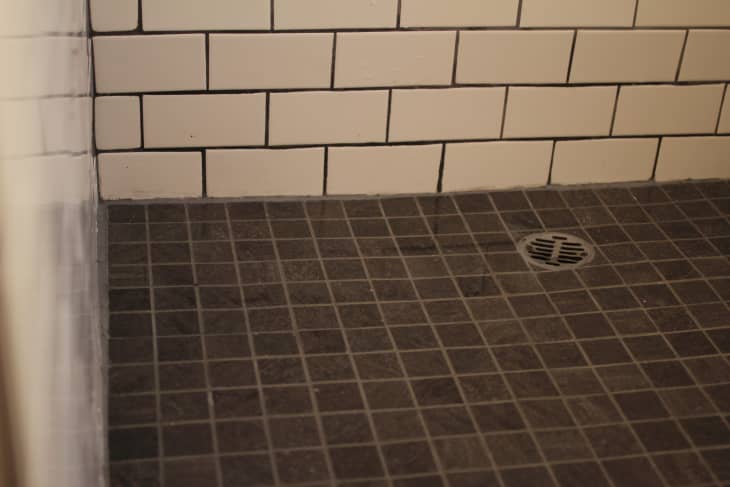
Note: The photo above reveals one of our mistakes. We were suppose to build the pan before we tiled the walls. To ensure a properly waterproof shower base, you need to paint the waterproofing liquid at least 3ft up the walls so that water doesn’t get under the tiles and onto the wood subfloors.
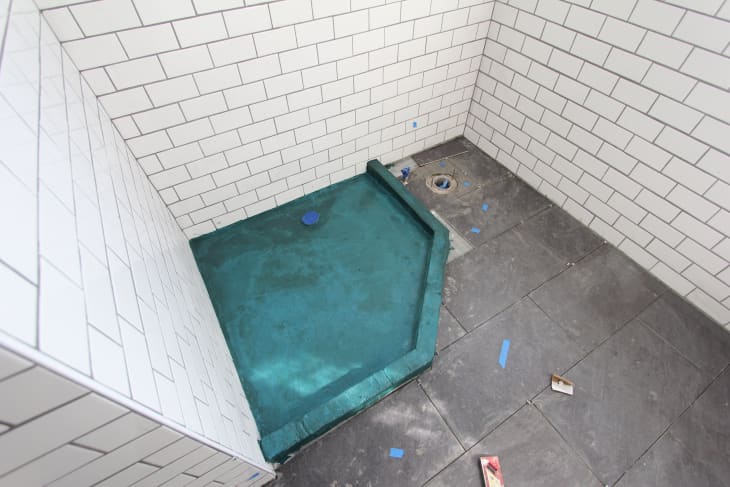
23. Allow the Aquadefense to dry totally (and turn dark green).
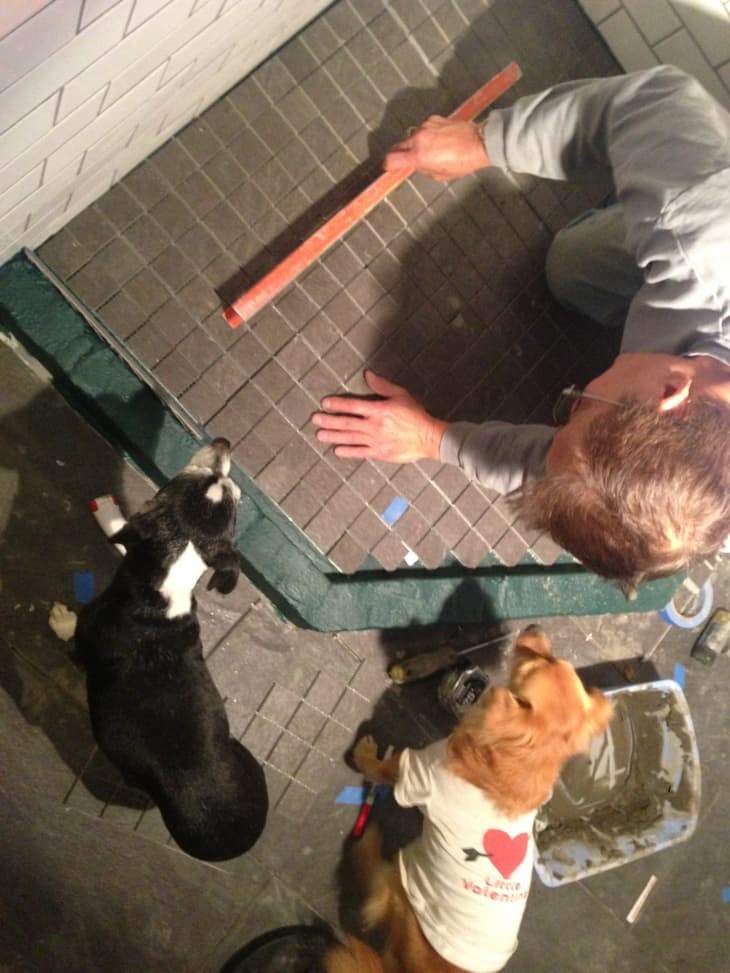
24. Now “dry lay” the tiles to ensure tiles will fit into the shower flow with no awkward slivers and cuts. (The dogs also really want to know if the tiles are sloping towards the drain.)
25. Make sure to use small mosaic tiles on the shower floor. Mosaic tiles are easier to create a gradual slope without it being too noticeable. The grout lines also give you more traction making wet floors less slippery. For steps and tips on how to tile read the AT tutorial here.
Tip: Be careful not to puncture the waterproofing when applying thinset and tile. If you do, re-apply Aquadefense and wait until it completely dries before applying tile.
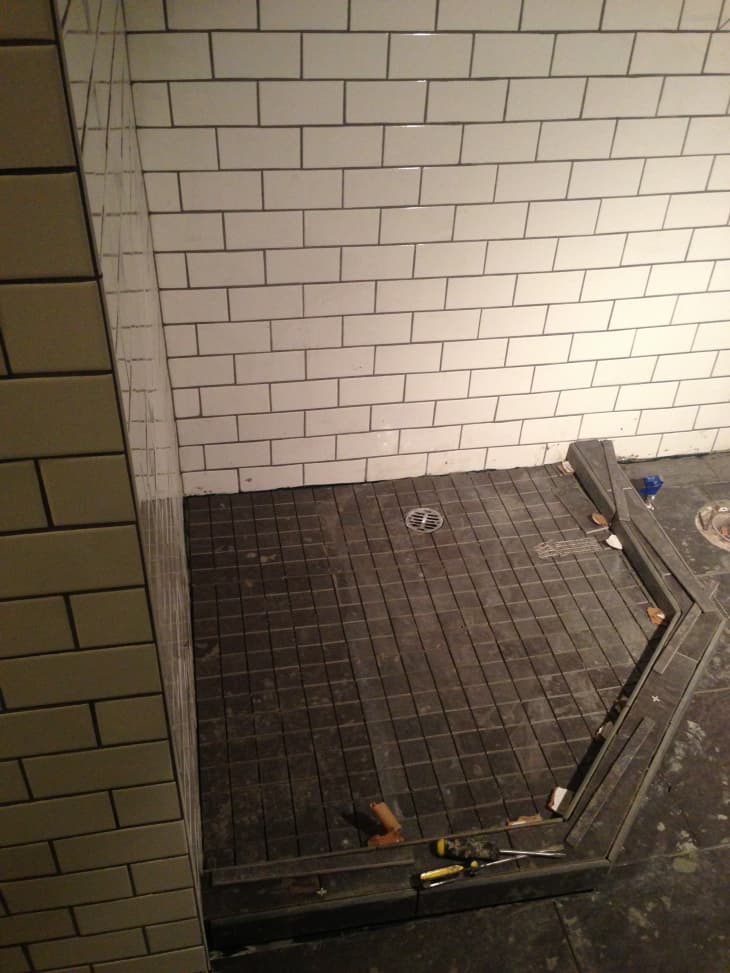
26. Carefully caulk the drain to ensure its circumference is completely sealed.
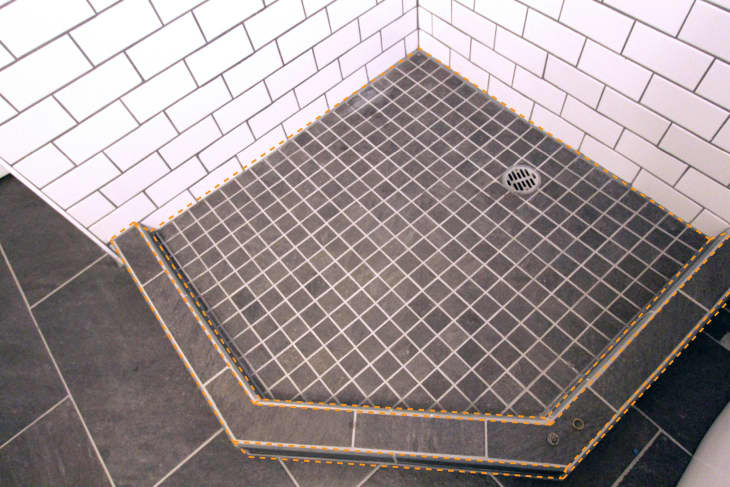
27. Caulk along the corners and every “change of plane.” This includes where the curb meets the small shower floor tiles, where the curb meets the large bathroom floor tiles, and where the small mosaic tiles meet the subway wall tiles.
28. Now, after grout cures, seal all grout lines (including your shower walls). Now I’m just waiting to get the Dreamline glass shower enclosure I ordered!
Shower Base Budget Breakdown for 40×40 Shower:
- 10 sq ft Galvano Charcoal Porcelian Mosaic Tiles – $100
- 3.5 sq ft Galvano Charcoal Porcelain Bullnose Tiles (for curb) – $50
- Scrap pieces of Galvano Charcoal Porcelain Floor Tile (for top of curb)
- 2 bags of Spec Mix Preblend Dry Motar -$12
- Aquadefense liquid waterproofing barrier – $45
- (2) 2″x4″x8ft wood board, 1/2×1″ wood board, screws, nails – $5 (we had most items from previous projects)
- Thinset – from previous project
- Grout – from previous project
- Tile Caulk – $7
Total = $219
Two 8 hour days plus curing time of 3 days
Note: Please take the extra steps to properly install the drain and all necessary waterproofing which I don’t fully cover in this tutorial. A properly sealed and waterproof shower base will ensure your subfloors and joists are safe from water damage and mold.