Have you ever tried building a farm for your minecraft character? If you haven’t probably you should, because it’s not as easy as it seem. And if you know how to do it, why don’t use this knowledge when creating real farms.
If you have spent much time on Minecraft, you know that the game can be pretty expansive: there are a lot of different blocks and items, and a plethora of possible creations to build. One way to make the game more interesting is to create an automatic farm. This guide will walk you through all the steps involved in creating your own automatic Minecraft farm.

How to build a automatic farm in minecraft
How to make an automatic farm in minecraft bedrock
There are many ways to build a automatic farm in minecraft bedrock. One of the most common methods is to use villagers, who will harvest crops for you and deposit them into chests. This method is very effective because it allows you to plant seeds at one location and harvest them from another location far away.
However, there are some disadvantages to using villagers:
1. Villagers can only harvest one crop at a time; if you want them to harvest wheat and potatoes, you must create two separate farms with different types of blocks and plants.
2. Villagers cannot be commanded to harvest all crops around them; they will only pick up the ones that they see first.
A farm is a place where you can grow crops, or raise animals for food.
The easiest way to make a farm in Minecraft is by using villagers. Villagers are villagers who have been turned into slaves by a Witch Doctor. They will do whatever you tell them to do, including farming, mining, etc.
To make an automatic wheat farm in Minecraft with villagers, follow these steps:
1) Find some room in your village where you can build the farm. It should be on flat ground with plenty of room so that you can fit as many villagers as you need.
2) Place some dirt blocks down and plant your seeds on top of them (see the picture below). You can use any type of seed, but wheat is the most useful because it is easy to grow and there are many uses for it once it’s grown!
3) Make sure there are no blocks above where your seeds are planted (see picture below). If there are any blocks above them then they won’t grow and all your hard work will be wasted!
Automatic farms are a great way to get your crops farmed and harvested. They can also be used for more than just farming crops.
![Minecraft 1.19 EASY Auto Wheat Farm Tutorial! [Works with carrots, potato, beetroot] [REMAKE] - YouTube](https://i.ytimg.com/vi/0GbUr8gJvq4/maxresdefault.jpg)
Here are some tips on how to make an automatic farm in Minecraft:
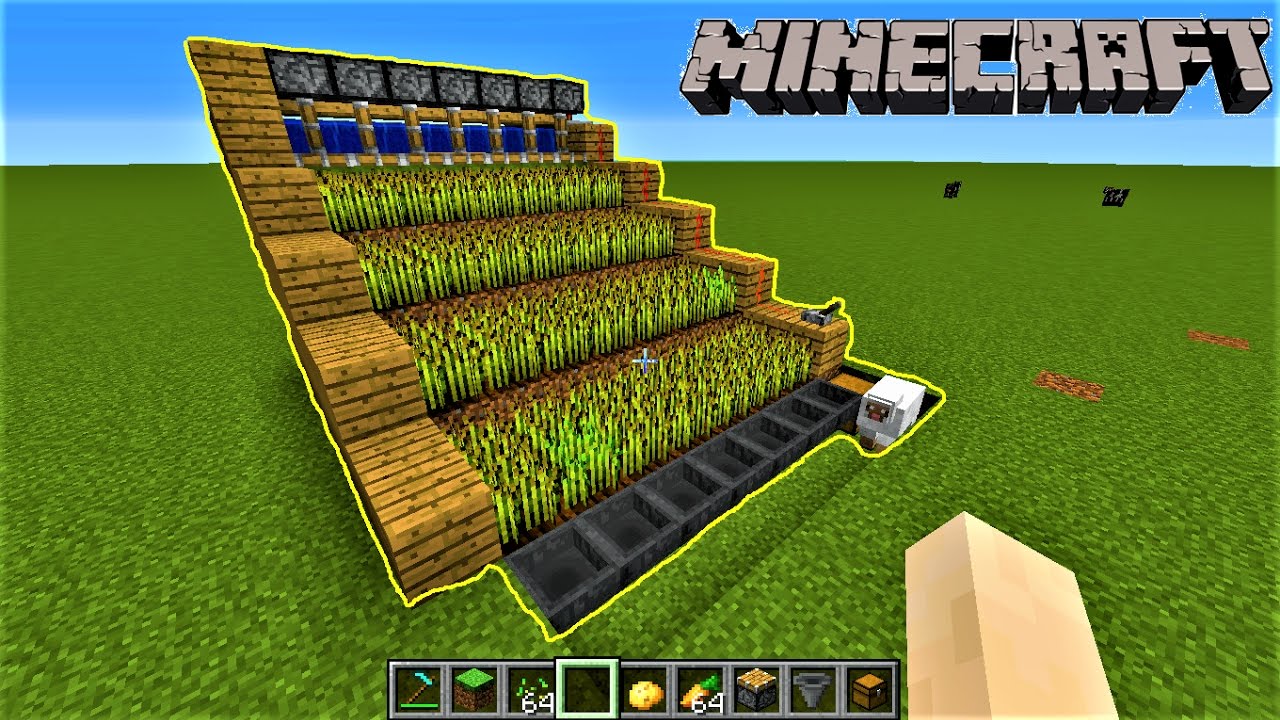
1. Use redstone circuits to power the farmland. You can use powered rails or a redstone torch to power farmland. This will allow you to plant seeds and harvest crops automatically.
2. Make sure you have enough space for your automatic farm. You want enough room so that your crops can spread out across the land without getting crowded or trampling each other’s leaves!
3. Build a villager trade station as close as possible to your automatic farm so that villagers can reach it easily and trade with it often!
This is the first automatic farm I made, based on a tutorial by paulsoaresjr.
This farm is very easy to build and it’s very efficient. It can be made in any dimension, but it’s best to make it in large dimensions since you’ll need a lot of villagers to work on it.
The materials you need:
-8 wooden planks
-1 piston (2 blocks high)
-4 sticky pistons (2 blocks high)
-1 redstone torch (1 block high)
-1 lever
In this video I will show you how to make an automatic farm in minecraft bedrock. The farm is very simple to build and easy to use. This is a good way for new players to get some items when they first start playing the game.
The next step is to get some villagers. There are two ways of getting villagers, one is by trading with villagers or by killing them and stealing their items. To get a villager trade with a villager until you get a trade option called “spawn”, when you press it it will spawn a villager nearby or at your house if you have one.
Once you have some villagers go into the world settings and change the game mode to creative mode so that all blocks in the world are available for use, this will make building much easier as you won’t need any materials such as wood or cobblestone.
Build up the walls around your wheat farm using cobblestone or other blocks until they are big enough so that no creeper can fit through them but still small enough so that they do not take up too much space (you don’t want them too tall). I would recommend making these walls 2 blocks high as this makes it easier to build
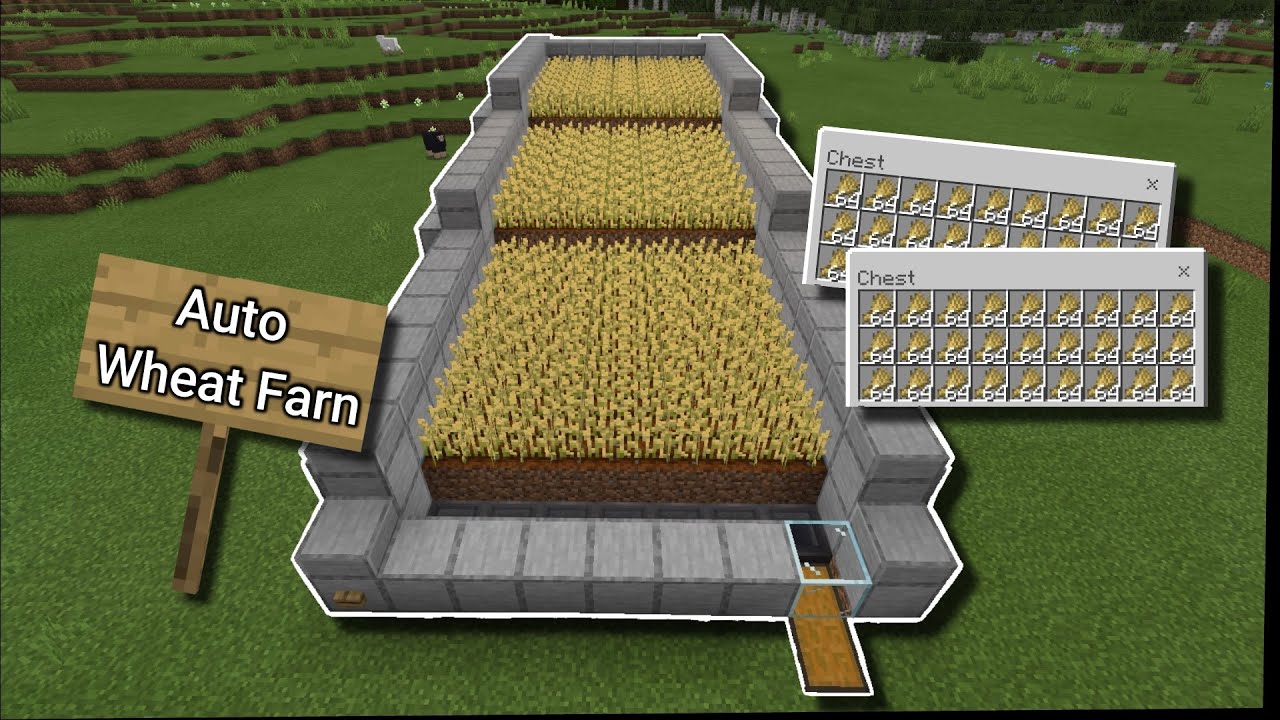
Farming is a great way to make money in Minecraft. There are many different types of farms you can create, but this guide will focus on the most popular, which is a wheat farm.
How to Make an Automatic Wheat Farm in Minecraft with Villagers
The first step is to find a suitable location for your wheat farm. You want to find an area where there are lots of villagers, but also some trees or bushes for them to gather wood from. Once you’ve found such a spot, place a door on each side of it so that you can walk through it without having to open it every time you want to go through.
Next, dig down until you reach bedrock and then start digging out blocks until there is enough space for your farm. Now place water sources and air blocks around the walls inside the cave so that villagers can breathe and drink when they’re working in there, otherwise they might die before their work is complete!
Once all of this has been done, place torches along the walls so that it’s easier for villagers to see what they’re doing and keep track of time while working inside. Now go back outside and stand on top of your cave entrance so that villagers can see you standing there waiting for them when they come home from work after dark
Mar 27, 2017 … How to Make an Automatic Farm in Minecraft – This is a simple tutorial on how to make an automatic farm in Minecraft, so you don’t have to keep coming back and forth from your …
How To Make An Automatic Wheat Farm In Minecraft – YouTube
https://www.youtube.com/watch?v=tGxZM0kbHb4
Jul 17, 2016 … I hope you guys enjoy this video! If you liked it please make sure to like, comment and subscribe! And be sure to check out my other videos as well! Also if …
Automatic Wheat Farm Tutorial – YouTube
https://www.youtube.com/watch?v=nITUWc6I1CM
Jul 19, 2013 … In this tutorial I show how to make an easy automatic wheat farm using pistons and redstone torches! The cool thing about this farm is that it …
In this tutorial, we will be learning how to make an automatic farm in Minecraft. This is a very useful thing to know if you want to get crops without having to worry about the time it takes for them to grow.
Step 1: The first thing that you need to do is create a room for your farm. You can do this by digging out a hole in the ground and then filling it up with dirt again. You should make sure that the room has enough space for you to put all of your crops into as well as some extra space for people or animals who may also want to use it.
Step 2: Now that we have our room ready, let’s put down some seeds! You can do this by simply breaking strands of wheat and placing them on dirt blocks inside your room. It doesn’t matter if they’re on top of each other or not because they will grow automatically without any help from us!
Step 3: Once our seeds have been placed inside our room, we can now move onto making our villagers appear! To make villagers appear, we must first build a blacksmith shop with an anvil inside it and then place four iron blocks around it.
If you don’t have villagers, you can use this tutorial to make a villager trading system. Here’s how it works:
1. Put a chest at the end of the farm, and put your items in there
2. Build a wall around your farm with a 2 block high gap between the blocks and the ground. This is so that the villagers can get through, but mobs can’t
3. Get some wheat seeds and plant them in front of your house (or wherever you want)
4. Now that you have wheat, you need to build an automatic wheat farm! To do this, place hoppers on top of each other, then connect them all together using redstone wire (redstone torches are optional). The hoppers should be facing down into chests that are also facing down into chests… You might have to experiment with this part as every server has different rules about what can go where! Once you’ve gotten it working properly, put water overtop of it all so that it runs automatically without any effort from you.