SSL/TLS is a network protocol used to encrypt data transmitted over the internet. The protocol is also used to control how information is routed through the network. Security professionals use it to protect sensitive web pages and web applications like WordPress websites, so they can be accessed only by those with permission.
As a security measure, many companies have stopped using HTTP and now only serve HTTPS. In fact, Google has announced that it will mark all websites without HTTPS as “Not Secure” in its search results. This means that if you want to keep your site in Google’s good books, you need to enable SSL on your website ASAP!

Using Ssl With WordPress
WordPress is one of the most popular platforms for creating websites and blogs. It’s also one of the easiest to use, which makes it an excellent choice for beginners.
But WordPress isn’t just a blogging platform. It’s also an excellent content management system (CMS), allowing you to easily manage your site’s content and layout. This makes it perfect for building e-commerce sites, portfolios and even landing pages.
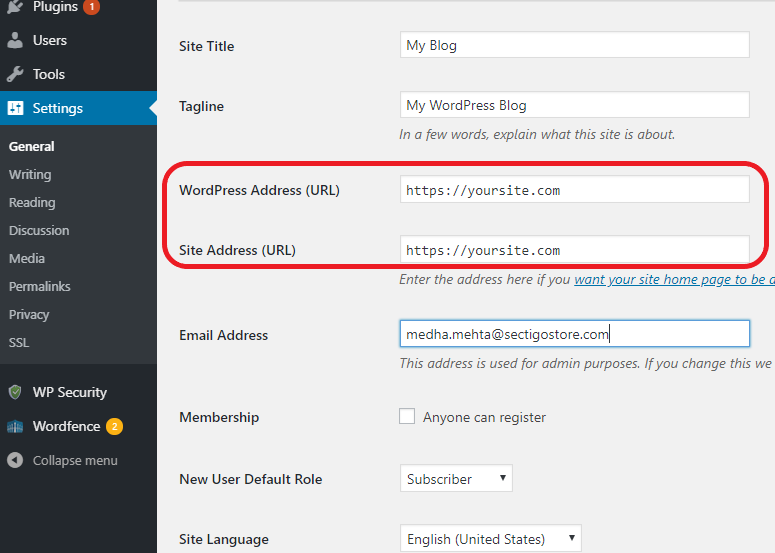
WordPress has built-in support for SSL/TLS encryption, but this only works with https:// addresses. To take advantage of this feature, you’ll need to install an SSL certificate on your server. This article explains how to do this in three different ways: manually, using LetsEncrypt and forcing all traffic through https:// automatically without requiring users to enter their username or password each time they visit your site.
If you are using WordPress for your website and want to setup SSL certificate for it, then you should read this article. In this article, I will show you how to install ssl certificate on wordpress manually or automatically.
Why do we need SSL?
SSL is a protocol that encrypts data between a web server and browser. This way all the data of your website will be encrypted and no one can see your content except you.
If you have installed WordPress on your website, then you must have heard about Let’s Encrypt (LE). LE has made it possible for everyone to get SSL certificates for free.
In this article, we will learn how to install ssl on wordpress manually or automatically using letsencrypt plugin
WordPress is one of the most popular content management systems. If you have a WordPress site, you can install an SSL certificate to secure your site.
Installing an SSL certificate on your website is important because it protects your visitors’ data and improves search engine rankings. WordPress makes it easy to add HTTPS support, but there are a few things you need to know before you start. This guide will walk you through how to install an SSL certificate in WordPress manually or automatically with Let’s Encrypt.
If you have a website, you should use HTTPS. It’s the de facto standard for securely transmitting information over the web.
But how do you get an SSL certificate? There are plenty of options, but one of the easiest is Let’s Encrypt, which provides free SSL certificates that are trusted by all major browsers.
In this article, we’ll walk you through how to install a Let’s Encrypt SSL certificate on your WordPress site.
WordPress is the most popular blogging platform in the world, and it’s also one of the easiest to use. It’s free to install and use, but you’ll need a host if you want your site to have its own address (website URL). This guide will show you how to install WordPress on your web host.
This process can be more complicated for beginners than for experienced users, but we’ll walk you through each step of the way.
Once you’ve installed WordPress, you’ll be able to start adding posts to your blog, uploading images, and more.
WordPress HTTPS – SSL Certificate Installation Guide
This guide will help you install an SSL certificate on your WordPress site using Let’s Encrypt.
Why Install an SSL Certificate?
There are several reasons why you might want to install an SSL certificate on your website:
Security – SSL encryption is used to protect the sensitive information sent between your browser and a web server. When you browse to a website with HTTPS, the browser confirms that the connection is secure by verifying the padlock icon in the address bar, or by showing green text in the URL bar. This ensures that no one can intercept and read your private data while it is being transmitted.
Compatibility – Most major browsers now show a “Not Secure” warning when users access pages without an SSL certificate installed. In some cases, this may cause issues with SEO or broken links for visitors who rely on outdated browsers such as Internet Explorer 8 or 9 (which don’t support HTTPS at all). You may also have trouble accessing certain features of WordPress if your site does not use HTTPS (such as Jetpack’s Photon module).
Trust – Google has stated that HTTPS websites will receive a boost in their search rankings, so installing an SSL certificate
I have a WordPress website and want to install an SSL certificate. The website is hosted with GoDaddy. I’ve read that I need to purchase an SSL certificate from GoDaddy, but it’s unclear how to actually do this. Do I need to install the certificate manually or can I use a plugin?
I have a WordPress website and want to install an SSL certificate. The website is hosted with GoDaddy. I’ve read that I need to purchase an SSL certificate from GoDaddy, but it’s unclear how to actually do this. Do I need to install the certificate manually or can I use a plugin?
How to Install SSL Certificate on WordPress
First of all, you need to have a domain name and hosting account. You can sign up for a HostGator shared hosting plan for as low as $3.96/month if you are just starting out, or if you have an existing domain name, you can use it with your existing hosting account.
Once you have your domain name and hosting account ready, login to your cPanel dashboard and click on SSL/TLS Manager icon.
Next, click on Generate Free SSL Certificate button, which will take you to the Let’s Encrypt site for generating a free SSL certificate. Once there, follow the steps below:
1) Click Get Started button in order to generate a new certificate request.
2) Enter your domain name in Domain Name field and click Next button. This will take you to next step where you will see some instructions that need to be followed carefully in order to complete this process successfully (don’t worry – we will guide step by step).
To install WordPress manually, you need to download the latest version of the software. While there are other ways to download the WordPress installation file, the best way is to use your web browser to visit wordpress.org/download.
In the top-right corner of that page, click on the Download button and save the file to your computer. You’ll see an icon for the main WordPress application but you can also download any of the additional themes or plugins that are available.
Once you have downloaded and saved the .zip file to your computer, unzip it by double-clicking on it. This will create a folder with all of those files inside of it.
Go back into your web browser and open up an SSH session with your server at godaddy.com/support/kb/article?id=229119123&articleTitle=Installing+WordPress+Manually+on+a+Server#229119123
Now we just need to upload our unzipped files over to our server using FTP by opening up FileZilla (or any other FTP client).
1. Create a new folder on your computer, name it www
2. Open the file called “hosts” in Notepad++ or any text editor. You can find hosts file here: C:\Windows\System32\Drivers\etc\hosts
3. Add this line at the bottom of your hosts file:
127.0.0.1 localhost
4. Save the file and close it.