WordPress is a free and open-source content management system (CMS) based on PHP and MySQL. WordPress was used by more than 60 million websites as of August 2017. WordPress is the most popular blogging system in use on the Web, at more than 60 million websites. It is also used by many corporate, political and non-profit sites.
WordPress was originally released on May 27, 2003, by its founders, Matt Mullenweg and Mike Little, as a fork of b2/cafelog. WordPress has been under continuous development since then and has grown in size and sophistication dramatically since its inception.
The name “WordPress” was suggested by Christine Selleck for her blog, which she called “My Cuppa Tea”, hence the naming of the software’s original directory in honor of her blog (“wp”).
Setting Up WordPress In Cpanel
In this guide, we will help you learn how to install WordPress in cpanel. WordPress is one of the most popular content management systems (CMS) used by millions of people around the world. It is a free and open source tool that allows you to create your own website easily. You can use it to create your personal blog or a professional website.
To install WordPress on your server, there are two ways: manually or through an installer. The latter is easier, but if you want more control over the process, then you should opt for manual installation.
In this guide, we will show you how to install WordPress manually using an FTP client like FileZilla or Cyberduck. We will also show you how to upgrade your site from version 3.7 to 4.2 using Softaculous Auto Installer (SAI).
How to Install WordPress in Cpanel
In this tutorial, we are going to show you how to install WordPress in cPanel. Before we start, we would like to mention that this tutorial is for shared hosting users. If you have a VPS or Dedicated server, you can use our guide on How To Install WordPress In Linux.
Before starting with the installation process, you need to create an account on Bluehost and create a website using the one-click installer. Hostgator also has a similar one-click installer for their customers.
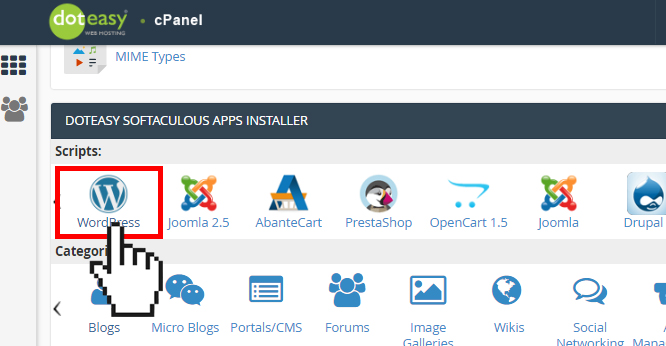
Once your website is created, head over to your Cpanel and login using your account details. Once you are logged in click on “Install WordPress” from the options appearing on the left sidebar as shown below:
Once clicked, it will open another page where you can see two options: “Install” and “Uninstall” as shown below:
How to Install WordPress in Cpanel
There are three ways to install WordPress:
Using a Cpanel-specific installer (which is the easiest way)
Manually uploading files (which is the most common method)
Using a plugin to automate this process (which is slightly more difficult than manual installation)
There are many ways to install WordPress on your website. You can use a tool like Fantastico or Softaculous, you can install it manually using FTP or SSH access, or you can use a hosting provider’s one-click install option.
If you’re using cPanel, it’s easy to install WordPress on your domain. Here’s how:
1. Log into your cPanel account and click on the “Installatron” icon. Click “WordPress” under “Software.”
2. The Installatron will automatically detect your domain and provide a link for you to follow to get started with installing WordPress on your site. Click the link and follow their instructions for setting up an account with them if you haven’t already done so.
3. After creating an account with Installatron and logging in via our interface, you’ll be asked to select the domain name for which you want to install WordPress. This is where it gets tricky — as long as both domains have been registered by the same person, there shouldn’t be any problems; however, if they were registered by different people who don’t control each other’s accounts (like friends), then there may be some issues with getting this working properly (I
How to Install WordPress in cPanel HostGator
1. Log in to your cPanel account.
2. Click on File Manager icon under the Files section on the left-hand side of the page.
3. On the next page, you will see a list of folders including Document Root and Subdomains located under your domain name (e.g www.yourdomainname.com).

4. Click on Document Root icon or any other folder which is available under your domain name.
5. You will now see two folders named public_html and wp-content within this folder, click on wp-content folder to open it up.
6. Now click on uploads folder within this new window and select all files present inside that uploads folder by pressing CTRL + A keys simultaneously followed by dragging them into your desktop or any other location from where you wish to import them back again once WordPress has been installed successfully in your hosting account (if you wish to keep these files as backup copy).
cPanel is the most popular web hosting control panel in the world. It has been around since 1995 and has over 60 million domains hosted on it.
The cPanel WordPress Toolkit makes installing and managing WordPress sites in cPanel an easy task. It provides an interface for installing, updating, backing up and restoring your WordPress installation. It also includes a great deal of useful information about how to use this toolkit as well as other resources for getting help with cPanel and WordPress.
There are two ways to install WordPress using this toolkit:
1) Click on the “Install” button next to “WordPress” at the top of the page. This will take you through the process of downloading a copy of WordPress and installing it in your account
2) Once you have installed a copy of WordPress in your account, you can use this toolkit to manage it!
How to install WordPress in Cpanel on Hostgator
Step 1: Login to your cPanel account.
Step 2: Click on the “File Manager” button.
Step 3: Click on the “New File” button.
Step 4: Give it a name and click on “Create File” button.
Step 5: Click on the “Open File” button to open the new file you have just created.
Step 6: Copy and paste this code into the text field of your new file named “index.php” and click Save Changes:
</p> <h3>Step 7: Now go back to your domain name and create a new subdomain called “wp”, example mywebsite.com/wp/. This will be used as the name of your WordPress installation.</h3> <p> </p> <h3>Step 8: Now go back to your domain name (mywebsite.com) and create a new directory named wp.</h3> <p> </p> <h3><strong><em><u><font size=”5″>Now we need to configure the newly created files with some important information.</font></
How to Install WordPress in cPanel Hosting
In this article, we will show you how to install WordPress on your cPanel hosting account. The steps are very simple and easy to follow.
Step 1: Login to your cPanel account.
Step 2: Click on the file manager icon on the left-hand side of the screen.
Step 3: Click on “Upload” button and upload your downloaded WordPress files onto your server using the file browser window that pops up after clicking “Upload” button.
Step 4: After uploading your wp-config-sample.php file and all other WordPress files, click on “Go Back” button at the top right corner of your browser window and then click on “Install a new application” link under the Software heading which will take you back to installer page where you need to click on Choose File button next to Upload Application File field and select wp-config-sample.php file from your desktop computer or laptop computer where you have already uploaded all WordPress files earlier. You can also paste https://example.com/wp-config-sample.php URL into this field instead of uploading
cPanel has about 900,000 clients, and is the most popular hosting control panel in the world.
cPanel is a web-based interface that allows you to manage your website from one place. It gives you access to a wide range of services such as email, databases, domains and more.
Some of the main features of cPanel include:
Web Hosting Control Panel for Managed Hosting Services
cPanel Hosting Control Panel for Shared Web Hosting Services
Manage your email accounts like Gmail, Yahoo! Mail and Hotmail from within cPanel. You can also create as many email addresses as you want with each account.
Manage your Domain Names with DNS Manager – You can register new domain names or edit existing ones in just a few clicks using DNS Manager. You can also use our free Whois Lookup Tool to check who owns a specific domain name before registering it yourself!