Email Marketing is a great way to build a relationship with your audience. It’s also a great way to get them to come back to your site and view more content. Email marketing is especially important for bloggers who want to build an email list and sell products or services. The good news is that it’s not hard at all! You can set up email marketing for your WordPress site in just a few minutes.
Setting Up Email For WordPress Site
WordPress is a content management system (CMS) that many webmasters use to host their websites.
WordPress is a great tool for managing your website and blog, but it doesn’t include an email service. In this article, we will show you how to set up email with your WordPress website so that you can receive emails from users who submit forms or contact you via email.
Email is a critical part of any website, especially if you want to get in touch with customers or send out newsletters. You can use an existing email address or create a new one for your site. The choice is yours!
In this article, we’ll show you how to configure two different kinds of WordPress plugins: Jetpack and MailPoet (for self-hosted websites).
You can set up your own email server, but it’s not recommended. It’s better to use a third-party provider, like Gmail or Yahoo Mail, which can send and receive emails on behalf of your website.
If you want to use WordPress to send out emails, there are several plugins that will help you accomplish this. The most popular one is WP Mail SMTP, but there are others as well.
For more information on setting up email with WordPress, check out this article: How to Set Up Email Using a Third-Party Provider
How to setup email for your WordPress site.
WordPress email settings are a must for any website, especially if you want to send or receive emails from your site. There are many ways to set up email with WordPress, from using plugins to installing custom code. In this article we will see how to set up email for a website using WordPress settings.
If you need help setting up your WordPress site, check out our article on how to install WordPress and our guide on how to install WordPress plugins.
Step 1: Login To Your WP Dashboard
First of all, log in to your account dashboard at https://yoursiteurl.com/wp-admin/. Once logged in, go ahead and click on “Email Subscriptions” under the Settings menu on the left sidebar.
Step 2: Setup Email For Your Site
Click on “WordPress Mailer” under Email Subscriptions in the left sidebar menu and then scroll down until you see “Manually Configure Your Server Settings” section (see image below). Here you will find two options:
SMTP Host – Enter here the SMTP host name or IP address of your mail server (e.g., smtp.gmail.com) along
Setting up email for your WordPress site can be a little tricky, and there are a few different ways to do it.
In this article, I will walk you through the steps of setting up email in WordPress.
The first thing you need to do is create an Email account on your hosting account with your provider (in my case, Bluehost). This is the same process as creating an FTP account or any other type of account on your hosting account.
Next, you will need to access your cPanel account which is where all of the settings for your server are located. You can find this by going to bluehost.com/cpanel and clicking on Open My Account.
Now that you have access to cPanel, click on Email Accounts and then click Create A New Account. Fill out all of the information required including choosing whether or not you want POP3 or IMAP and what type of authentication you would like to use (usually just regular password). Make sure that you note down all of these details because we will be using them later! Once you have created your new email account, click Save Changes at the bottom of the page then scroll down until you see Manage Email Accounts which looks like this:
If you’re using WordPress, you can set up your own email server.
If you want to send emails from your website, it’s usually best to use a third-party service like MailChimp or SendGrid. These services are more reliable and easier to manage than setting up a mail server on your own.
However, if you want to try out an email server for fun or learn about how email works, it’s possible to set one up on your own server.
In this guide, we’ll show you how to install PHP Mail on a Windows Server machine running Apache so that you can send and receive emails directly from the web browser.
Configuring your WordPress email settings is a simple process that can be done by anyone. This guide will show you how to configure your WordPress email settings, including:
How to access wordpress email
Configuring wordpress mail settings
Configure a mail server for the first time
Add mail service providers (Gmail, Hotmail, etc) to your site
This article will help you get started with configuring your WordPress email settings.
WordPress Email Setup
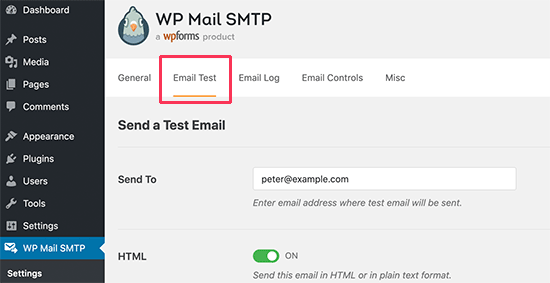
To configure your WordPress email, you need to enter your domain name and the SMTP details provided by your web host. If you are using a shared hosting, then you need to contact them and ask them to set up your account for sending emails.
When you have added the required details, click on the Test Settings button, which is located at the bottom of the page. This will send a test message to the given address. If all goes well, you will receive an email confirmation in your mailbox.
In this tutorial, we will see how to access your WordPress email account.
WordPress Email Inbox Settings
The first thing that you need to do is to make sure that your email is configured properly. To do this, open up WordPress and go to Settings > General and make sure that the following settings are set correctly:
1) Your site’s email address (e.g., info@example.com) should be correct and working
2) Emails from admin are sent from the same address as above
3) Send mail using SMTP (check this if it’s not checked by default)
If you are a WordPress user, you must be well aware of how to access your WordPress admin panel. But many of us don’t know that there is also a way to access our WordPress email account. If you want to check your WordPress mail, then this article will help you know the different ways in which you can do it.
Accessing WordPress Mail Inbox
The first thing you need to do is login into your website admin panel by entering its URL in the address bar of your browser or by logging in through FTP (File Transfer Protocol). Once you have logged in, click on the “My Account” link from the left navigation bar. This page lists all of your sites and displays their stats like number of posts, comments, themes and plugins installed etc. Now click on “WordPress Mail” under the “Administration” column as shown below:
This will take you to a new page where you will see an option named as “Mail Subscription” with an empty text box next to it. Type in your email address here and click on “Subscribe” button at the bottom right corner of this page:
Once subscribed, you will get an email from WordPress asking
In order to set up your WordPress site to send emails, you need to use the WordPress SMTP plugin.
The plugin will allow you to send emails using your own mail server instead of using a third-party service like MailChimp or Constant Contact.
How to Set Up Your WordPress Site to Send Emails
Here’s how you can set up your WordPress site to send emails:
First, install the WP Mail SMTP plugin. Log into your WordPress admin dashboard, go to Plugins > Add New and search for WP Mail SMTP. Click Install Now and Activate when prompted.
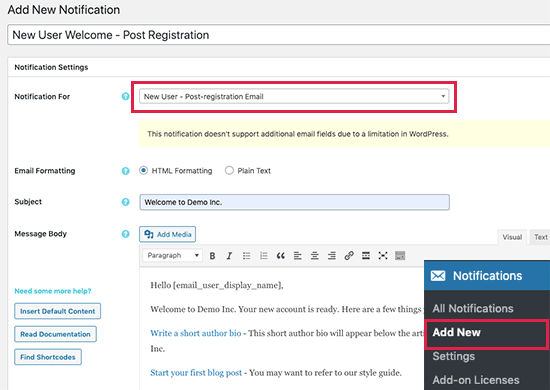
Next, go to Settings > WP Mail SMTP. Under General Settings, enter your name in the From Name field and type your email address where it says From Email Address (this is what people will see as the sender). Next, enter your actual email address in the From Email Address field (this will be used by email providers such as Gmail). If you have multiple addresses associated with that account on different servers then you can enter all of them here separated by commas.
To complete setup click Save Changes at the bottom of the page then click on SMTP Ports tab under Settings section and click Save Changes again after entering port numbers for each type of connection method