Understanding how to build a wood truss is a fundamental skill that any complete carpenter or framing specialist needs in order to be able to design, build and repair structures. Although they are all different, their basic elements and their functioning remain the same.
There’s nothing more beautiful than wood trusses! They can be both elegant and strong. Moreover, they are tough, versatile, and low maintenance, how to build a wood roof truss, how to make wood trusses. In this article you’ll find out what things you need to know about wood trusses to build one yourself instead of hiring someone for it.

How to build a wood truss
Wood trusses are typically used in construction as an alternative to wood rafters. A wood truss consists of two or more triangular shaped pieces of wood that are connected together at the ends and supported by wall plates and joists. The wood is generally glued together, but other types of connections can be used in some cases.
Wood trusses are built to support the weight of a building’s roofing material and can span large distances between supports. They are made from different types of wood depending on their purpose and location within a house or other structure. For example, exterior trusses may be made from treated pine or fir because these woods will not rot quickly from exposure to water and moisture. Interior trusses may be made from hardwoods such as oak and maple because they are more durable than softwoods like pine and fir.
The first step in building a wood truss is choosing which type of wood you want to use for each part. You should select different types of lumber for each piece so that they all fit together properly when assembled into one unit. You’ll also need enough lumber for each piece so that there will be enough excess length left over after cutting each part for extra strength and stability when connecting
How to build a wood truss?
Trusses are structures that are built to support the roof and distribute its weight evenly across the structure. They are often used in houses, but they can also be used in other structures such as barns, storage facilities and even stadiums.
There are many different types of trusses available, each with their own advantages and disadvantages. One of the more common types of trusses is called a wood truss. These are easy to build and can be made from a variety of materials including wood or metal. In this article we will look at how you can make a wood truss yourself.
How to Build a Wood Truss Roof
The simplest and most common method of building a wood truss roof is to use metal plates that are bolted together. The top plate is attached to the rafters, which are in turn attached to the joists. The bottom plate is attached to the floor joists or subflooring. Metal plates can also be used as connectors between different types of trusses, such as gable, hip and valley trusses.
The following steps will help you build your own wooden roof trusses:
1. Determine what type of roof you want to build and how much wood you need for your project. Gable roofs require three pieces of lumber, while hip roofs require four pieces of lumber (two per side). Valley roofs require two pieces of lumber per side and a valley piece at each end.
2. Cut all your pieces according to the measurements given by your construction plan or blueprints. Make sure that you have enough wood left over if any mistakes happen during assembly!
3. Lay out all your pieces on their sides in order from shortest piece at bottom left corner to tallest piece at top right corner (or vice versa).
How to build a wood truss
Wood trusses are the most common type of roof framing in residential construction. They consist of two parallel sides, called chords, connected by a series of diagonals, called bracing. The chords are generally made from 2×4 or 2×6 lumber and the bracing is made from 2x4s or 2x6s. The bracing can be left exposed or covered with plywood or OSB sheathing.
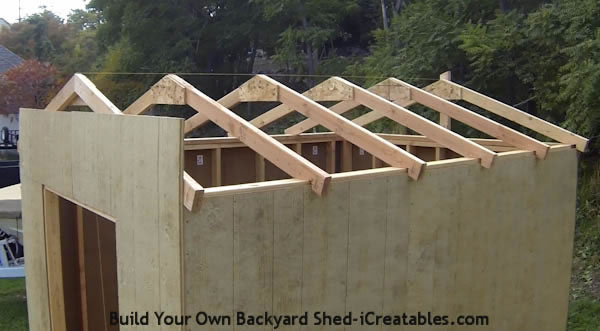
Trusses are typically built on-site, but they can be assembled in advance and transported to the site if they aren’t too large.
The process for building a wood truss is:
Mark out and cut the chord members
Cutting chord members on-site using a circular saw. Cut each end of every member at a 15° angle so that it fits into the corner of another member when assembled. Mark and cut the diagonal members in a similar manner. Use a speed square to ensure that each member is square during these cuts.
How to Build a Wood Truss
1. Use the chart below to determine the size of your trusses. The height of each truss is represented by the first number, and the length is represented by the second number. (Example: A 2×6 truss would be 6 feet high and 12 feet long.) Be sure to add an extra foot for the height of each truss so that you can install a metal hanger along the bottom edge.
2. Cut all your pieces using a tablesaw or circular saw. For accuracy, use a speed square as a guide when marking your cuts on both sides of each piece — this will ensure that they are exactly 90° angles.
3. Install metal hangers at the bottom of each piece using screws or nails (nails are easier). Place two nails every 18 inches along both sides of each joist (this will give you plenty of wood to hammer into when installing your trusses). Set aside any pieces that are too long to fit in your shop; these will be installed later on site.
How to build a wood roof truss
Building a roof truss is an easy project that will help you create a sturdy, attractive structure. You can use this method to build a shed or garage, or you can use it as the foundation for a larger building such as a house. This article will explain how to build a wood roof truss using common tools and materials.
Step 1 – Measurements
Before you begin building your trusses, you need to make sure that you have the proper measurements. It is necessary to measure each side of the triangle because all three sides must be equal. If any of the sides are not equal then it will affect the strength of your trusses significantly.
Step 2 – Cutting
Once you have determined how long your trusses need to be, cut them out using your circular saw or table saw depending on what type of wood you are using. Try not to make these cuts too long because they will be difficult to work with when making joints later on in this process.
Step 3 – Joining Pieces Together
It is important that your joints are tight and strong so that there are no gaps between them when finished with this project so do not skip this step!
If you have a woodworking or carpentry background, then you may be interested in learning how to build a wood roof truss. Although it might seem like a daunting task at first, this kind of project is actually quite simple and easy to do.
If you are not familiar with the term, a roof truss is basically a structure that supports the weight of the roof and distributes it evenly across the entire structure. This can be done by using beams or bars that are connected together with bolts and other structural hardware.
Trusses are usually made from metal, but they can also be made from wood as well. If you want to learn how to build your own wooden trusses, then this article will show you exactly how it’s done.
Trusses are structures that use a series of interconnected triangles to support load-bearing walls. They are used in construction for a variety of reasons, but most commonly for bridges and roofs.
Trusses are most often made out of metal or wood, although there are other materials that can be used as well. Metal trusses have the advantage of being able to span long distances without losing integrity; they also have the disadvantage of being very heavy and difficult to transport once they’re built. Wood trusses may be less expensive than metal trusses, but they require much more time and effort to build them properly.
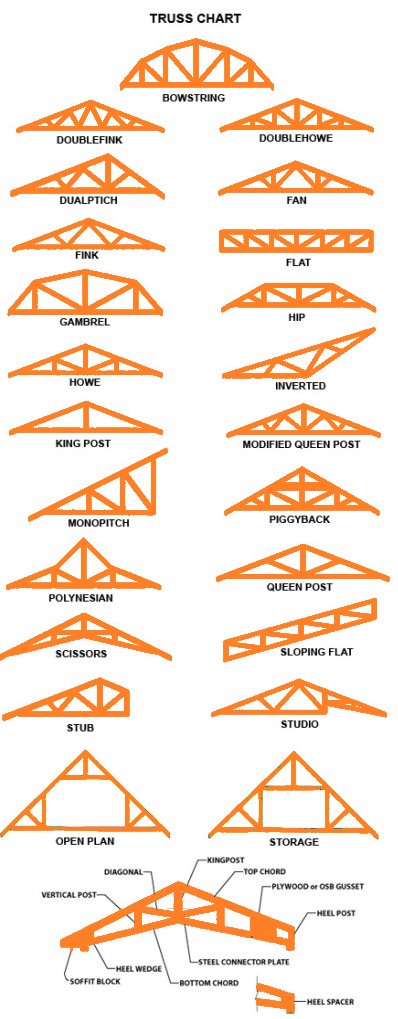
The most common type of wood truss is called a king post truss; it uses two vertical posts in the center of each side and diagonal braces between them. A queen post truss has two vertical posts on one side and diagonal braces on the other side instead of center posts. A modified king post truss adds additional vertical supports on both sides instead of just one side; this helps prevent the structure from becoming twisted over time due to stress from wind pressure or seismic activity.
A truss is a structural framework of joined parts, usually forming triangular units. Trusses are typically composed of triangles because this shape can produce a structure that is strong and rigid, and provides easy connection to the adjacent pieces.

Trusses are used in building construction as part of a structural system to create space within a building while supporting the building’s weight from below. In order to provide stability, they must be built so they resist lateral movement, or swaying, caused by wind loads and ground movement.
Wood roof trusses are the most common type of roof trusses used in residential construction. They are commonly used on homes with pitched roofs made up of two types: gable roofs and hip roofs.
The easiest way to build a truss is with 2x4s.
You need to know that the 2x4s are at least 1-1/2″ thick. If they’re not, you can’t use them for this purpose.
You also need to know how long the top chord of your truss will be, as well as how far apart the joints will be on the bottom chord.
You’ll also need to know how wide your roof is and what type of rafter you want to use (traditional, modified or scissor). The diagram at left shows how this works for a traditional rafter system. If you want more information about the different types of rafters, see my article on wood roofs for more information on how to build those types of roofs.