Wall shelving units have existed for decades. In the 70’s and 80’s, you would look at them as a wall mounted plywood board with evenly spaced holes. The spacing was so even, it easily could be mistaken for a professional engineer doing the work because there is no way your typical human could install it that even.
How to Build a Wall Shelving Unit, how to build a large wall shelving unit, how to build a wall mounted shelving unit. Building a wall shelf is not as hard as you might think. Take these easy steps and you’ll get the job done right.

How to build a wall shelving unit
If you want to build a large wall shelving unit, first measure the distance between two walls. This will be the distance between the end of one shelf and the end of another. Add 2″ to this measurement. This will be the width of your shelves. For example, if there is 12″ between two walls, add 2″ and your shelf width will be 14″.
Next, cut 4 pieces of wood at this length with a miter saw (or circular saw). Make sure that they are straight and flat. Now measure from their ends and make marks every 4″. These marks indicate where you need to drill holes for screws.
Once all four pieces have been drilled (with a drill) you can begin attaching them together using screws. The easiest way is to use a Kreg Jig which makes drilling holes and screwing in screws quick and easy! If you don’t have one, just use regular wood screws in pre-drilled holes and hammer them into place as tightly as possible until they’re flush with the surface of your wood (this prevents anything catching on them when you place things on your shelves).
If you have an empty wall in your home, you may be wondering what to do with it. After all, it can be a bit boring to just leave it blank. Fortunately, there are many things that you can do with this space. One of the most popular options is to build a shelving unit for it. This is a great choice because it makes use of the space and looks nice as well. Here are some tips on how to build a wall shelving unit:
1) Measure your wall
The first step in building a wall shelf is measuring the area where you want to put it. This will help you determine how much material you need and whether or not your design will fit properly in that spot.
2) Purchase materials
The next step is purchasing all of the necessary materials for building your shelf unit. Things like lumber, nails, screws and other hardware should be purchased at this point so that they can be cut down later on when needed during construction.
3) Cut pieces of lumber
After purchasing all of the items needed for building your shelf unit, you will need to cut them down into smaller pieces using either a miter saw or circular saw (depending on what type of wood). For example, 4x4s can be
A wall shelf is a great way to add storage to any room. It can be used for displaying collectibles, books, and other things that you want to keep out of the way. It can also be used as an accent piece or feature wall in your home.
The first thing you need to do is decide on the size of your wall shelf and how many units you will need. You can use one large unit or several smaller ones depending on what you have planned for it.
The next step is to pick out some good quality lumber for your project. You should choose wood that has been dried properly so it won’t warp or split when you are working with it. If possible, try to find lumber that has been kiln dried rather than air dried because this will prevent warping and splitting.
Once you have selected your wood, cut all the pieces using a table saw if available or by hand using a circular saw and a miter saw. This will allow all of your pieces to fit together perfectly without any gaps between them when they are assembled together later on in the project.
The next step is to assemble all of your pieces into groups according to their size and length before joining them together permanently with nails or screws
Here’s how to build a wall shelving unit.
This is a very simple woodworking project, with just four pieces of lumber, some nails and screws and a few tools. The end result is a nice looking and useful piece of furniture that will look great in any room in your house.
You can make this shelf as long or short as you need, and it doesn’t have to be limited to just books; it’s perfect for displaying photos, plants or other items. This project requires only basic woodworking skills, but if you’re new to carpentry, check out some of our other tutorials before tackling this one: How To Use A Circular Saw How To Use a Router How To Use A Table Saw How To Use A Jigsaw How To Use A Router Table
Materials:
1/2″ plywood (scrap is fine)
2″x2″ lumber (about 2′ long)
#8 1 1/4″ screws (or long enough to go through 2″x2″)
3/4″ finishing nails
Step 1: Cut the lumber to length. Start by cutting two of the 2x4s to 26 inches each. These will serve as the top and bottom of your shelf. Then cut two more 2x4s to 22 inches each. These will be your sides.
Step 2: Build the frame. Attach one of the longer boards (26 inches) to one end of your shorter board (22 inches) with a 3-inch galvanized wood screw every 6 inches. Repeat this process on the other side, creating a frame that measures 44 by 22 inches.
Step 3: Attach the top and bottom boards to the frame using 2-inch galvanized wood screws every 6 inches along the entire length of both pieces.
Step 4: Attach one of your short side pieces to one end of your long side piece using 3-inch galvanized wood screws every 6 inches along its entire length. Then do the same thing with your second short side piece on the other end of your long side piece, so that you have two separate boxes made up of two pieces each (one long and one short).
Step 5: Attach one corner brace to each box using 3-inch galvanized wood screws at each corner where they meet

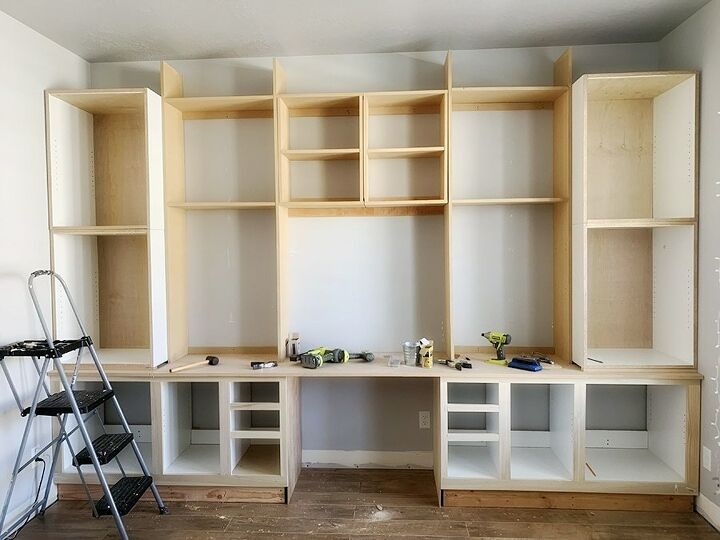
How to build a large wall shelving unit
I am going to show you how to build a large wall shelving unit. It’s really easy and only takes about 30 minutes.
This is an easy DIY project that you can do in a couple of hours.
The materials are cheap and simple, so it won’t cost you much money to make this shelf.
These instructions will teach you how to make the wall mounted shelving unit with step by step instructions and photos.
In this video I show how to build a large wall shelving unit. This is a great project for beginners and the building process is not that difficult.
The dimensions of the unit are: 12 feet long, 2 feet deep and 4 feet high. The total cost of materials was about $200.
The main advantage of building your own wall shelves is that you can customize them according to your needs, save money and have fun doing it!
The large size of the unit makes it a perfect hanger for coats and other garments. It can be used in any room of your home, but it is most commonly used in the entryway, living room or bedroom. The large hanging space makes it easy to store items that you use every day, so they are always within reach.
This DIY project requires basic carpentry skills and tools. You will need a circular saw, drill and screwdriver along with some lumber and nails or screws. The amount of lumber you need depends on the size of your shelf unit. If you want to build several units, such as a wall of shelves or bookcases, then you may want to purchase wood pieces from a hardware store or home improvement center instead of building them yourself.
How to Build a Wall Shelf
Building your own wall shelves is an easy and cost-effective way to add much-needed storage space to your home. You can build the shelves out of nearly any type of wood and with the right tools and supplies, it doesn’t take long to build a shelf.
Wall Space Considerations
Before you begin building your wall shelf, think about where you want to put it and how large you want it to be. You’ll also need to consider what kind of material you’d like the shelf made out of — wood, metal or plastic?
Once you’ve decided on a design and material, measure the wall space where you’d like to put the shelf. This will help determine how large the shelf should be and how many studs are available for mounting purposes (if any).
You can choose from different types of wood when building your shelving unit: pine, fir, cedar or redwood are all good choices because they’re inexpensive and look nice as well. If you want something more natural looking than plywood or particle board, choose one of these woods instead.

Building Your Wall Shelf
Once you’ve figured out where exactly you want your new shelf placed in your home, follow these steps:
This is a simple and easy DIY project.
You will need:
-A saw (preferably a miter saw)
-A drill with a screwdriver bit (or a screwdriver)
-A pencil/marker
-Measuring tape or ruler
-Wood glue
-Paint & brushes (optional)