A wooden enclosure or sub box is used to protect and isolate the speaker(s). This speaker box is normally made out of lumber. If you want to build a square sub box, then it means that the sides and front of the box are square.
This article will discuss the art of making a wooden subwoofer box and the basic construction techniques to build one. It covers the topics of woodworking safety, what you will need to build a box, step by step how-to’s and diagrams on building an enclosure.

How to build a sub box
The most common type of subwoofer enclosure is the sealed box. This is because it’s fairly simple to build, easy to use and can handle a wide range of subs. The sealed box is also relatively inexpensive when compared to other types of boxes.
Sealed boxes are made from wood or plastic, but they’re not all created equal. There are many different ways you can make your own subwoofer enclosure, but there’s one method that stands head and shoulders above the rest — the “foam” method.
In this guide, we’ll show you how to make a square sub box out of foam using our step-by-step instructions below:
This sub box is designed for a single 12″ subwoofer. I used this box to build a custom-fit enclosure for my SVS SB12-NSD, which has a diameter of 13.25″.
I used 1/2″ mdf and a router to cut out the shape of the box. The only tools you really need are clamps and a drill with a hole saw attachment.
Materials:
1/2″ mdf (medium density fiberboard)
wood glue or liquid nails
wood screws (preferably phillips head)
carpet tape or duct tape
We will be working with a piece of 2X4’s to build the box. First, we need to cut the 2X4’s so that we have 2 pieces that are 15 inches long and one that is 17.5 inches long.
Now take one of the 15 inch pieces and place it on top of one of your other 15 inch pieces. The two pieces should overlap by 1/2 inch down each side. Use some wood glue and screws to attach them together.
Now measure 6 inches up from the bottom and mark it with a pencil or marker. This will be where we cut out for ports later so mark it here now so you know where to cut later on.
Now take your last 15 inch piece and place it on top of these two pieces that are already connected together. Now measure 6 inches up from the bottom again but this time make sure it is centered between both sides (make sure you measure from one corner to another). This will give you enough room for ports later if you need them so make sure they are centered! Once again use some glue and screws to attach this piece as well
The first step in building a subwoofer box is to determine the size you want. If you’re using a prefab enclosure, it should come with instructions telling you how much room you need. If you are building your own, the best way to figure out the size is to measure the dimensions of your subwoofer and add a few inches of clearance on all sides. You also need to make sure that you have enough space inside the car for the box itself.
Make sure that whatever material you use is not flammable or toxic, especially if you’re planning to build it inside your home.
If you’re making your own subwoofer enclosure, then here’s what you’ll need:
MDF wood (or similar material)
A saw (circular)
A drill with bit set
A screwdriver (Phillips)
Countersink bits
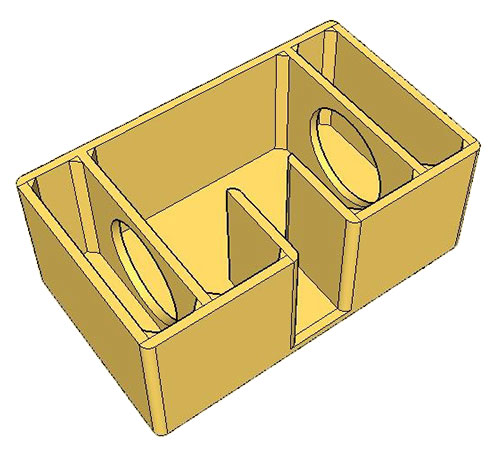
Step 3: Cut the interior braces from the plywood sheet. The braces form a square, so measure the length and width of your box, then divide by two. Cut four braces to those dimensions.
Step 4: Use the utility knife to cut out the holes for the ports. There are many ways to do this, but I prefer using my dremel tool because it makes a clean cut and doesn’t tear up any of my other tools.
Step 5: Glue and screw together all of the pieces of wood like you would any other project.
How to build a wooden sub box
If you’re like me, you want to make sure your car audio system is perfect. One way to ensure that your car audio system is going to give you the best sound quality possible is by building a custom enclosure for your subwoofer.
The first step in building a subwoofer enclosure is choosing the right materials. The most common materials used for DIY speaker boxes are MDF (medium-density fiberboard), plywood or particleboard. If you’re building a square sub box, it’s best to use MDF or particleboard since these materials are more rigid than plywood or other types of wood.
The next step is cutting all of the pieces for your sub box enclosure. This involves measuring and marking all of the pieces, then cutting them with either a table saw or circular saw. You’ll need to use clamps to hold pieces together when gluing them together so that they don’t move around while drying (you can also use clamps when gluing multiple pieces together).
After gluing all of the pieces together, sanding down any rough edges with 100-grit sandpaper until smooth before painting with primer paint (or whatever color you prefer). Once dry, apply two coats of
Does anyone know how to make a square sub box? I haven’t been able to find any instructions on the net. I’m going to build one out of 2″x4″s and plywood; but I don’t know how to shape the front baffle so that it’s not just a rectangle.
I’m planning on using this for my 12″ JBL GTO615 subwoofer, which has dimensions of 14-7/8″ tall x 13-7/8″ wide x 11-7/8″ deep.
Does anyone have any experience with making sub boxes? If so, could you please share some tips or advice?
The first step to building a square sub box is to build a frame out of 2x4s. Cut the pieces to length and assemble them together with glue and screws.
Use a table saw or circular saw to cut the top, bottom, left and right panels to size.
Assemble the sides by attaching them to the box frame. Make sure the seams are flush with each other, then drive screws into place through pilot holes drilled in each joint. Once again, make sure all your joints are flush before driving any screws.
Attach the front panel to the box frame using glue and nails or screws. Follow up with a few clamps while it dries so it stays straight and flush with the rest of your box’s sides.
Cut two pieces of plywood that will serve as your speaker baffles from 1/4-inch material. These will be attached inside the front panel when you’re done building this project so make sure they fit snugly into place before attaching them permanently to your box’s frame
You can build a subwoofer box from scratch, but the easiest way is to buy a kit. These kits include everything you need, including the wood and glue.
In this article, we’ll show you how to build a wooden sub box using these types of kits.
What You’ll Need
A pre-cut sub box kit
Lumber (1/2″ x 4″ x 8′)
All purpose wood glue
Screws (3″ long)
Step 1: Gather Materials
You’ll need the following tools and materials:
A square sub box kit from a home improvement store. The box kits are made from MDF (medium density fiberboard) and come in a variety of sizes.
Wood glue for joining pieces together
Sandpaper for smoothing out seams and rough edges
Tape measure for measuring cuts
Marker for marking cuts in the wood paneling