Studio booths are a boon for many different types of professionals, and people who are curious about the process of building a booth. They can help musicians record more naturally in a more acoustic setting, which can lead to better sounding recordings. The same is true for podcasts or interviews with multiple people in the room. But it’s not just professionals — anyone who is interested in building a smaller apartment or studio is drawn to these booths, because they continue to be bulletproof ways to create natural sounds within small environments or rooms that have no good acoustics as-is.
So you want to start recording your own voice actors without being in a stale, air-conditioned room? That’s great! We’re here to advise you how to build a recording booth and make it as cheap as possible!

How to build a studio booth
A studio booth is a great way to improve the sound quality of your home recording. A good studio booth can drastically improve the acoustics of a room, making it easier to record high-quality audio. It also makes it easier to record multiple instruments at once, since they won’t bleed into each other’s tracks. If you’re planning on starting a home recording business, or just want to record your own music, then building a studio booth would be an excellent investment.
In this tutorial, we’ll show you how to build a simple and affordable studio booth for around $100. This is far less than what most companies charge for their booths, and it should give you all the benefits needed for your project.
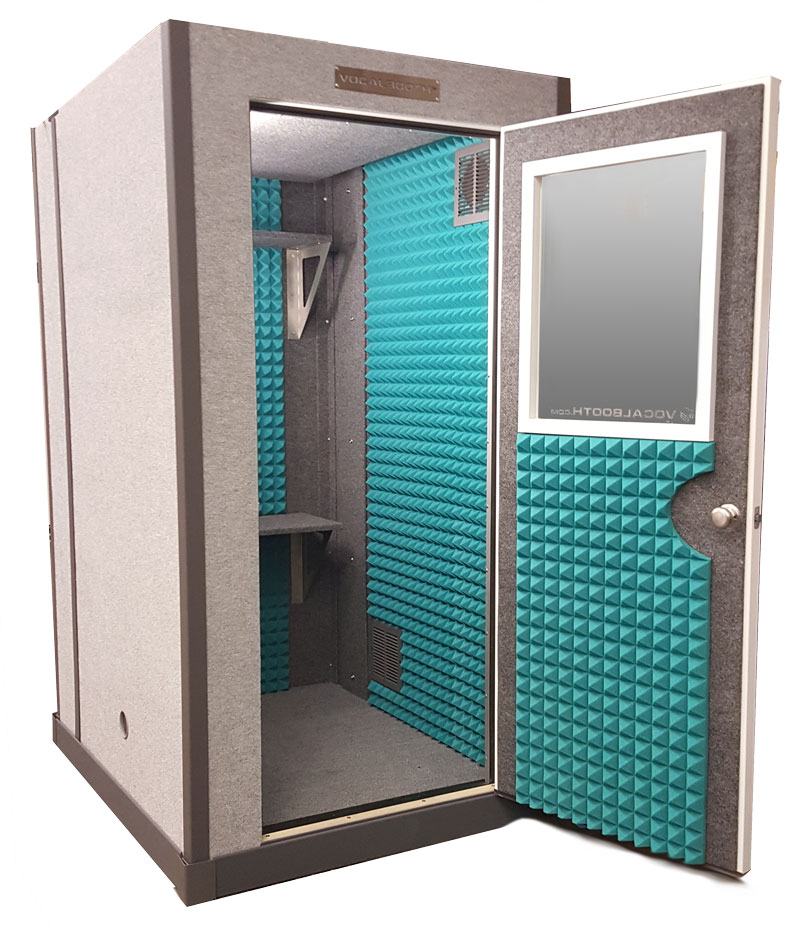
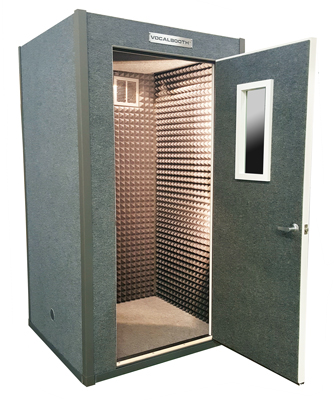
A studio booth is a box with a hole in it. It’s used to make an audio recording sound more professional and to prevent echoes, which is why it’s called a studio booth. You can build your own with a few tools and materials, including a few pieces of wood, some rope and glue.
Step 1: Measure the size of your booth
Measure the inside dimensions of your booth by measuring from one side wall to another while standing inside the box. This will give you the width and length of your booth. The height will be whatever you want it to be (as long as it’s not too tall). Keep in mind that if you plan on using this for film making purposes (i.e., filming yourself), your camera needs to fit inside the box as well!
Step 2: Cut pieces of wood for sides and top
Cut out two pieces of wood for each side wall that are as wide as your measurement from Step 1 and as tall as whatever height you want them to be (make sure they’re at least an inch taller than you). Cut out two pieces that are as long as your measurement from Step 1 and cut out holes in those pieces so they can fit together like a puzzle when put together (make sure they
Building a studio booth is a great way to get started with recording. You can build your own custom recording space or buy pre-made models from companies like Auralex and Acoustics First.
Studio booths are relatively easy to build and the materials are relatively inexpensive. Here are some tips for building your own studio booth.
1. Choose a location for the booth that has good acoustics, away from any walls or other objects that could cause unwanted sound reflections. The best place for an isolation booth is in an unused corner of your home or office where there isn’t much activity going on nearby.
2. The size of your booth will depend on how much space you have available, but it’s best to keep it as small as possible so that you don’t lose too much room around it when you’re using it with microphones, instruments and other equipment. A small 3 x 4 foot booth will provide adequate sound isolation for most projects, but if you want more room then increase the dimensions accordingly until they exceed 10 x 10 feet in size (which is about as large as they should get).
3. Use at least 1/2 inch thick plywood or MDF board when building your walls, floor and ceiling panels
In this article, we will show you how to build a studio booth. The booth is used for recording, mixing and mastering music.
The first step is to buy all the materials needed for the project. You can find them at any hardware store or online. The second step is to plan where to place your equipment and what materials you need for each part of the booth.
The first thing you will need is acoustic foam; it needs to be at least 1 inch thick so that it absorbs sound from hitting it. Next, you will need fabric or something similar that will cover the foam so that it looks nice in your studio. You can use any color but make sure that it blends well with your room or you might want to paint the walls instead of using fabric or something similar.
The next thing on our list is acoustic panels; these are basically just panels made out of wood or other materials that absorb sound waves when they hit them so they don’t bounce back into the room where they came from (which would disturb your recordings). These are also very cheap and easy to install yourself if you know how to use a drill and have some basic knowledge about construction work!
If you’re building a recording studio, one of the first things you’ll want to figure out is where to put the booth.
I know that seems like a no-brainer, but trust me, it’s not.
There are so many variables that go into choosing a booth location that it can get overwhelming pretty quickly. So let’s break it down into three basic categories:
Studio Location – This category addresses things like how far away from windows and noise sources (e.g., air conditioners) you want your studio to be located. It also deals with whether or not you have enough space to put everything where you want it.
Booth Design – This section will help you determine if there are any other special considerations for your design (e.g., space for extra equipment). And finally…
Budget – The final section will address how much money you have available for building your studio booth!
The most important thing when building a studio booth is to make sure that you have enough room for the camera and lights. You’ll also need to make sure that you have plenty of space to move around, or else it could be hard to shoot in your own studio. You may want to consider building your booth on wheels so that you can move it around. This will allow you to get better angles and keep the lighting consistent.
If you want to build your own studio, here are some tips:
Build a sturdy structure. If you’re going to be using this as your primary work area, make sure that it’s made with strong materials and won’t fall over if someone bumps into it. Use studs instead of 2x4s if possible because they’re much stronger than other types of lumber. Also remember that studs are only 16 inches apart while 2x4s are 24 inches apart. This means that studs will give you more stability in your structure overall since they won’t sag as easily as 2x4s do when weight is added on top of them (like when we put walls up).
Make sure there’s enough room
The booth is the heart of the studio and it’s where you’ll spend most of your time. It’s also the most expensive part of your setup, so it’s important to think carefully about your needs before you start shopping for gear.
If you’re just starting out, there are a few things you can do to save money. You don’t need a big, elaborate booth that costs thousands of dollars — just something that will keep sound from spilling into other rooms and allow you to record without interference from outside noise. If you’re recording in an apartment or condo, this can be as simple as building a frame around your door with two-by-fours, then lining the inside with egg crate foam (available at any home improvement store). The foam prevents sound from escaping through small cracks between boards and reflects sound back into the room (which helps prevent echoes). For added protection against outside noise, consider adding some kind of heavy fabric over top of the frame — canvas works well because it doesn’t absorb moisture like other fabrics will if they get wet (which means less mold down the road).
Studio apartments are great for single people, couples, and anyone who wants to live in a smaller space without sacrificing comfort. But if you choose the wrong one, it can feel like you’re living in a box.
Here are some tips for making your studio apartment feel like home.
1. Use every inch of wall space
If there’s one thing that makes a studio apartment feel cramped, it’s having walls that go unused. If you have an extra-long wall, add shelves or built-in cabinets to hang on them. If not, hang up artwork in frames or buy some inexpensive prints and put them on the wall with thumbtacks or pushpins. You can also hang things on the ceiling — just make sure they’re secure enough not to fall down!
2. Add storage space
The lack of storage space is one of the biggest issues people have with studio apartments, because there’s just no room for all your stuff (especially if you’re living alone). One way around this is to get a bookshelf or two — these can double as storage space (especially if they’re tall enough) while still looking nice and adding some extra visual interest to your apartment
Studio apartments and lofts can be an amazing place to live. The key is to make it feel like home.
Here are some tips on how to create a warm, inviting studio apartment:
1. Choose the right furniture for your space.
2. Vary the heights of your furniture pieces for added interest and depth.
3. Integrate storage into every room in your studio apartment, such as a desk or a built-in bedside table or bookcase next to the bed.
4. Make sure there’s enough light in your apartment by including plenty of windows, skylights, or track lighting fixtures with bulbs that emit a soft glow instead of harsh light (which can be distracting). Don’t forget outside lighting too! Lighting up your entryway will make it feel welcoming when you come home at night (and also help deter intruders!).
A studio apartment is a great first step into the world of apartment living. They’re cheaper than larger apartments, and they offer a lot of space for the money you pay.
So if you’re looking to move out on your own, here are some tips to help you pick out that perfect new place.
Take measurements
Before you start looking at apartments, take some measurements of the space where you plan to put your furniture. This will give you an idea of how much room you have to work with and how it will look once everything is in place. If the measurements don’t match up with what’s available in an apartment, it might be time to look elsewhere!
Figure out what kind of kitchen you want
Kitchen cabinets can be expensive, so it’s important that you figure out what kind of kitchen cabinet design you want before starting shopping around for apartments. Some people prefer modern designs with clean lines and minimal hardware; others like traditional kitchens with lots of storage space and built-in appliances. It all depends on your own personal style and budget!