Your personal life, your business, and the environment all benefit from the use of solar power. But how can you utilize solar power if you don’t own one? A big part of the answer to that question involves the pool; indoor ones, outdoor ones — even solar heaters for fish ponds. This article will tell you how to build a stove top cover . Well, actually it helps you figure out how to cover your gas or electric stove with solar power.
Whether you burn wood, or use gas you need one. WHY? You might hate cleaning your barbecue grill, but an outdoor stove top is the kind of cleaning you can’t ignore.
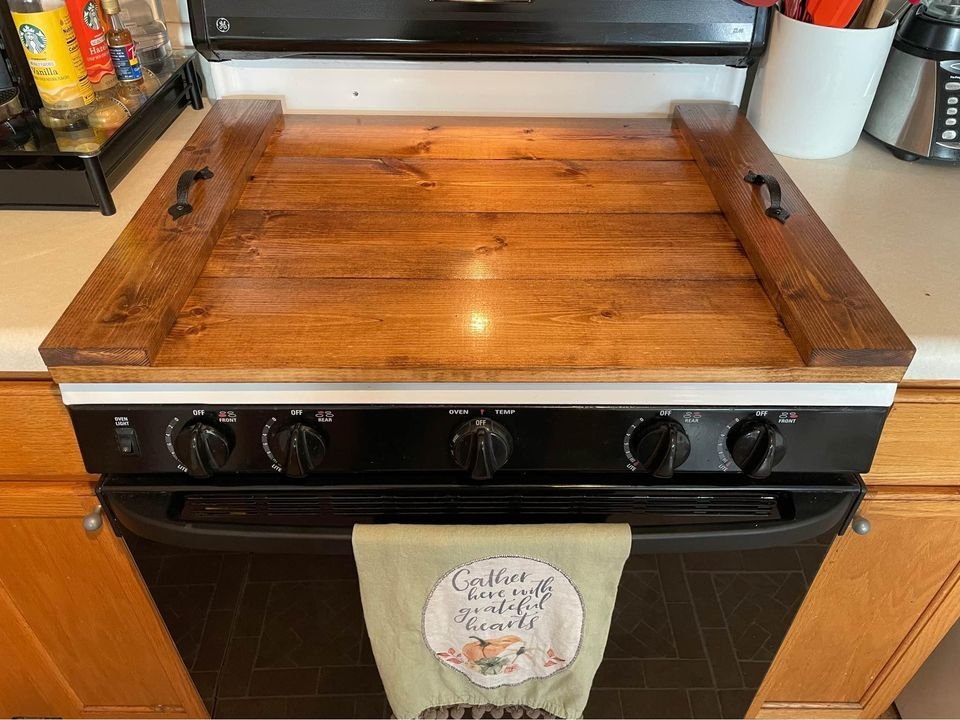
How to build a stove top cover
A stove top cover is a simple project that will help protect your stove from spills, splatters, and general messes. And if you have kids or pets, it’s a good idea to make sure they don’t accidentally touch the hot surface.
This tutorial shows how to build a gas stove top cover from scratch. If you want to save money, you can buy an old microwave oven for $20-$30 at a garage sale and remove the glass door to use as your cover.
The following steps will show you how to make a wood stove top cover:
1. Gather Your Materials
Here are some materials that will help make this project easier:
A circular saw with a fine-tooth blade (for cutting plywood)
A table saw (optional)
A drill with a 1/2-inch bit (or 1/4-inch bit if using wood glue)
Wood glue (if using wood veneer or fiberboard)
How to build a gas stove top cover
1. Cut out the top of your box using a jigsaw or coping saw. The opening should be large enough to easily fit over your stove burner, but not so large that it will allow flames to escape.
2. Cut out holes for your knobs using a jigsaw or coping saw. You can leave them as is if you are using knobs with handles on them; otherwise, cut out holes big enough so that you can fit the knob through them without having to force it in place.
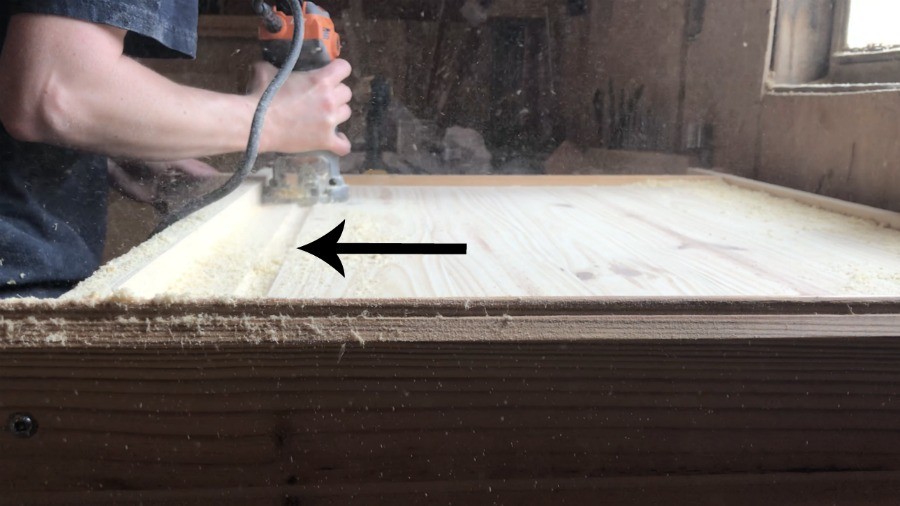
3. Sand down any rough edges or sharp corners on the outside of your box so that it is smooth and safe to handle when moving around on your countertop surface.
4. Paint or stain the outside of your box if desired (optional). If leaving unfinished wood exposed like this, choose an exterior paint or stain instead of interior paint/stain because it will not have fumes that could irritate you while cooking on top of this unit (if left unfinished). You could also paint or stain only one side of the box so that there is still some variation in color between sides even if they are both exposed wood (like painting one side white and leaving the other side natural wood).
5
Making your own wood stove top cover is easy. All you need is a few basic materials, some basic tools and an afternoon to spare. If you want to make it really fancy, however, you can add decorative features like a raised border around the top of the cover or a decorative handle.
Step 1 – Cut Your Boards
If you want to build a wood stove top cover from scratch, measure your stovetop and cut two pieces of plywood to fit over each side of the stovetop. The width should be about 1/4 inch smaller than the width of your stovetop so there’s room for expansion when the wood burns and contracts. The length should be at least 2 inches longer than the depth of your stovetop plus 2 inches extra for overlap at each end. For example, if your stovetop is 20 inches deep and 30 inches wide, cut each piece at 22 inches by 32 inches.
Step 2 – Mark Your Holes
Measure up from one corner at 4-inch intervals and mark each point with a pencil where you want holes drilled through both pieces of plywood so they line up on both sides of the woodstove. Make sure these holes are evenly spaced apart so they line up when you attach the boards together using screws through
If you want to protect your stove from scratches and spills, consider building a custom cover. This can be done in a number of ways.
Here are two simple options for building a gas stove top cover:
1. Build a box using plywood and glue, or use corrugated cardboard if you want something more temporary. Cut holes for the burners and the knobs.
2. Use an old frying pan or pot lid as the cover for your stovetop by gluing it in place on top of your box or cardboard construction.
A stove top cover is a great way to protect your stove from dust, pets and other contaminants. You can also use it as a trivet for hot pots and pans, or even as an extra work surface when you need more room in the kitchen.
The best part about making your own stove top cover is that you can customize it to fit your needs. If you’re short on time or money, you can make a simple cover out of cardboard or foam board. If you want something more durable that will last a long time, try using wood or metal.
Cardboard Box
If you’re looking for a quick and easy solution, try using an old cardboard box as the base for your new stove top cover. Just make sure that it’s clean and sturdy enough to hold up well over time — if not, reinforce it with tape or glue before using it as a base for your project.#ENDWRITE
Building a wood stove top cover is an easy and inexpensive way to protect your stove from the elements. As with most projects, the best place to start is with a plan. The first step is to measure your stove and take notes on its size and shape. Then, measure and mark the pieces of wood you’ll need to cut.
Cutting Wood for Your Wood Stove Top Cover
To cut wood for your cover, use a circular saw or other saw with a blade designed for cutting plywood or similar materials. Cut each piece of wood according to your measurements and mark any additional cuts that may be needed during construction. Cut all pieces before moving on to assembly because some cuts will require more than one pass through the saw.
Constructing Your Wood Stove Top Cover
Once all of your pieces are cut, it’s time to assemble your cover. Start by laying out all of the pieces on top of one another and using screws or nails (depending on which type of material you’re using) to secure them together at the corners. Once all four corners have been securely fastened together, flip over the entire unit and repeat this process on the bottom side until both sides are attached securely together
Depending on how old your gas stove is, it may not be as safe as it once was. If you have an older gas stove, you will want to make sure that it is in good working order before you begin cooking. You can do this by checking all of the pipes for leaks and making sure that the burners are fully lit.
When the cooking process is complete, you will need to clean up the area around your stove. This can be done with a simple wipe down or by using a mild cleaner if necessary. If you notice any problems with your stovetop during this process, consult with a professional immediately. This will help prevent serious issues from occurring later on down the line.
A wood stove top cover helps keep your oven clean and protects it from the elements. The cover also keeps the ashes from falling into the oven and allows you to cook more efficiently. You can build a simple lid from plywood, using the same techniques as for making doors and drawers.
The size of your stove top dictates the dimensions of your lid. For example, if your stove is 24 inches wide, make the lid 24 inches wide. This will give you room to walk around safely without bumping into it or getting burned by an open flame.
Cut two pieces of plywood to fit around your stove top, leaving a ½-inch gap at each end so that air can circulate underneath. Attach one piece to a flat surface with screws or nails every 2 or 3 inches along the edge where they meet up with each other. Use glue and screws to affix each end piece together so that they are securely fastened but still allow air movement through them.
Wood stove top covers are a great way to protect your wood stove from the elements. Stove tops are an important part of your home, and they can get damaged very easily if you don’t take care of them. They are also very expensive to replace if something bad happens to them.
Wood stoves can be used for heating your home in the winter, but they can also be used as a cooking source during the summer months. You can cook on top of your wood stove just like you would cook on any other stove top, and it’s usually easier than cooking on an open fire.
You should have a cover for your wood stove so that it is protected from everything from rain to snow to insects that might try to eat through the wood in order to get inside of it. A good cover will also keep debris from accumulating around the base of the stove which could cause problems for those who are using it for cooking purposes.
There are many different types of covers available for purchase, but if you want one that is custom made then you will need to build one yourself out of some type of material that is durable enough so that it won’t fall apart after a few months or years of use by people who have children running
You can easily build a wood stove top cover to protect your kitchen from soot and ash. This cover has the added benefit of allowing air to circulate around the stove.
This project takes about two hours to complete. You can use any type of lumber, but I recommend using cedar because it’s naturally rot-resistant, easy to work with and inexpensive.
Materials:
2x4x8′ cedar (or other rot-resistant lumber)
1/4″ plywood or particleboard
1″ screws
Finishing nails or brads