Here we’ll look at how to build a storage shed ramp, beginning with the materials you need, followed by tips and tricks on how to build a shed ramp.
A storage shed ramp will enable you to get everything you need into your shed easily, and also enable you to get all tools out of the building, so that it can be cleaned. That being said, if you have not already built a storage shed, now may be the best time to start the project. We assume that if you are looking for shed ramp plans, then you already have plans for a shed. While the design is up to you, take into account that is going to be held together by screws or nails and start from this point.
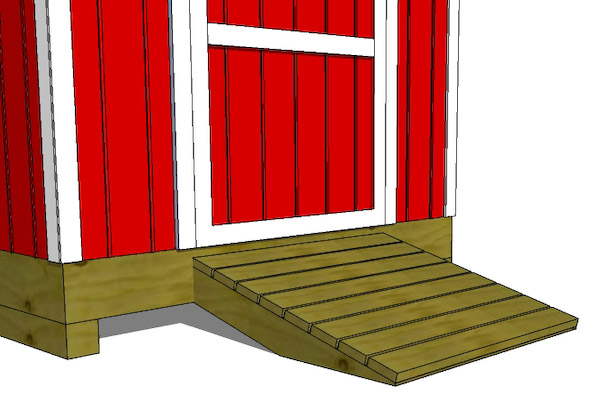
How to build a storage shed ramp
A storage shed ramp is the perfect way to provide your family with an accessible place to store items you want to keep out of sight. It’s also a great addition for those who have limited mobility, allowing them to move heavy items into the shed without having to struggle with them. And no matter what type of material you’re using for your shed, building a ramp is fairly easy.
Step 1: Measure the Height of Your Shed’s Doorway
The first thing you’ll need to do is measure the height of your shed’s doorway. This will give you an accurate idea of how tall your ramp should be so that it can easily enter and exit the shed.
Step 2: Cut 8-Foot Pieces from Your Pallets
You’ll need eight pieces of lumber that are exactly 8 feet long. If they aren’t already cut this way, use some tools such as a saw or circular saw to cut them down into 8-foot lengths. If you don’t have access to these tools, ask someone who does (such as a local hardware store) if they can cut these pieces down for you before moving forward with this step!
Step 3: Attach 4 Boards Together (Make Them into a Square)
Start by
Building a storage shed ramp can be an easy project if you have the right tools and materials. You’ll need some 2x4s, a level, a saw and some paint or stain. You may also want to consider adding a handrail for safety.
Step 1: Measure Your Storage Shed
The first step is to measure your storage shed so you can determine how long and wide your ramp will be. Use a tape measure to get the exact measurements of each piece of wood you will use for your shed ramp. Make sure that your measurements are precise so that your ramp will fit perfectly in the space between two sides of your storage shed.
Step 2: Cut the Wood
Once you have determined how long and wide each piece of wood needs to be, it’s time to cut them all into four equal parts using a circular saw. This will create four pieces of wood that are equal in length but different widths depending on how many inches wide they were originally cut into when they were purchased at the lumber store.
Step 3: Create Raised Sections on Each Side
After you’ve cut all of your boards into 4 equal pieces, it’s time to create raised sections on each side of each board using
Building a storage shed ramp is an easy way to get your tools and lawn equipment out of the garage and into the backyard. You can build a basic wood ramp or one that’s more elaborate and decorative.
A basic wood ramp has two or three steps, depending on how steep you want it. It’s often built from treated lumber, but pallets work well too.
A more elaborate ramp may have railings or be made of composite materials like vinyl or plastic. The best way to build a storage shed ramp is to follow these steps:
Stake out the ground where you plan to place the ramp, so that you know exactly where it will go. Use stakes and string to mark where each step will go.
Dig out dirt from around each stake until there’s enough room for the step to sit on top of the ground without being buried too deep.
Use a level across each stake placement to make sure they’re all at the same height above ground level, then dig out dirt as needed until all stakes are level with one another.
A wooden ramp is the easiest way to get your lawn and garden equipment into your shed. Add a few steps and a handrail to make it safer.
If you have an outbuilding, like a shed or garage, chances are you need a way to get your lawnmower, snowblower, generator or other equipment in and out easily. A wooden ramp is probably the simplest solution since it can be built quickly and easily with just two sheets of plywood, some 2x4s and shingles. It’s also inexpensive — I spent less than $40 on my ramp — so it’s not as though you have much to lose if something goes wrong. If you want to add some style or safety features to your new ramp, this project will give you plenty of ideas on how to do so.
The first thing you need to do is get your materials together. The list below will help you get started:
• Two 8-foot 2x4s
• Four 6-foot 2x4s
• One 4-foot 2×4
• Two 12-foot 2x4s
• One box of 3″ screws (1 lb.)
• 16d nails or deck screws (1 lb.)
You can use either 16d nails or deck screws to build your ramp, but the screws make it easier to remove the ramp later if you want to change its location or if you want a different direction for it. The screws also make the ramp stronger and more stable. The nails are cheaper and will hold the structure together just as well, but they don’t give as much flexibility later on.
How to Build a Storage Shed Ramp Out of Pallets
A pallet is a flat, rectangular unit of wood or plastic that’s often used for shipping or storage. They can be easily stacked and secured, making them ideal for storing large amounts of material. You can repurpose pallets to build your own shed ramp in order to access the storage area high above ground level.
Step 1: Plan Your Project
Before you begin building your storage shed ramp out of pallets, you need to decide exactly what size and shape you want it to be. There are many different types of pallets available, so you have lots of options when it comes to choosing which ones will work best for your project. You also need to consider how many steps you want in your ramp, as well as how wide each step should be. When planning your project, make sure that each step is large enough for someone to walk up without feeling cramped or having trouble navigating around corners.
If you’re looking for a new shed, but don’t want to spend a lot of money, you may be interested in building one yourself. You’ll have more control over the size and design of your shed, and you can save a lot of money by doing it yourself.
There are a few different ways to build a shed from scratch, but today we are going to show you how to build a storage shed ramp out of pallets.
This is one of the easiest ways to make your own outdoor storage shed without spending thousands of dollars on materials.
This project requires minimal tools and very little skill level. You’ll be able to complete this project with just an axe and saw; however, if you don’t already have those tools laying around then they are easy enough to purchase at any hardware store or home improvement store like Lowes or Home Depot.
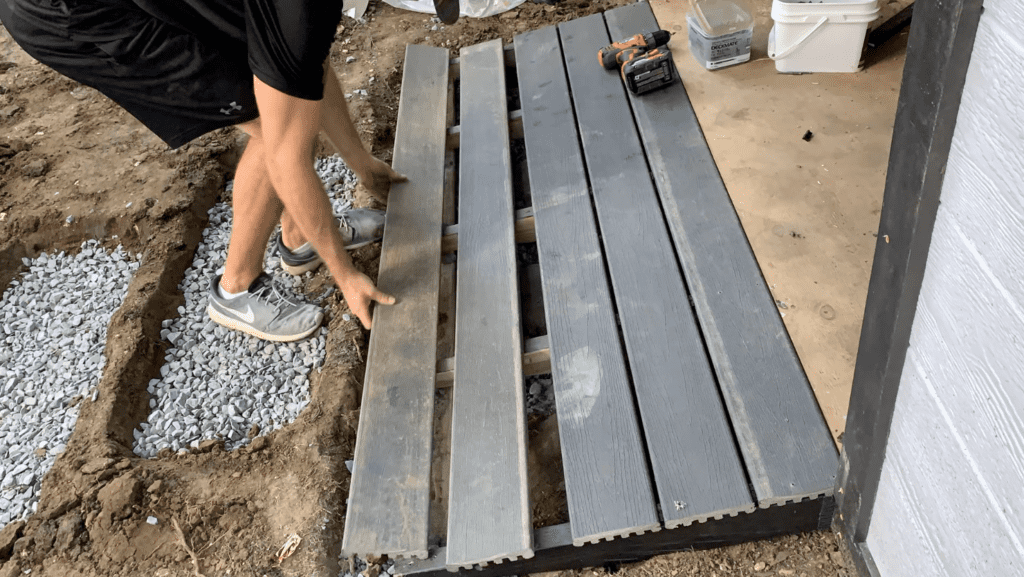
A few weeks ago, I wrote a post about how to build a shed ramp out of pallets. I thought it was a pretty good idea and decided to give it a try myself. I really wanted to get my storage shed emptied out so that I could start working on some other projects and clean up the yard at the same time. So here’s what I did:
First, I cut up some 2x4s into smaller pieces with my circular saw so that they would fit nicely into the gaps between the pallets. Then, I nailed them in place with some nails that were leftover from another project. It wasn’t too difficult because there aren’t any corners for your nail gun to get hung up on like there would be if you were building something out of wood planks or boards instead of pallets.
After that, I used some more 2x4s as cross supports underneath where they were needed so that they wouldn’t bend under pressure from heavy items being put inside the shed (roofing materials). The last step was to paint everything gray so that it matched my house better than if it were still natural oak color!
How to Build a Storage Shed Ramp from Scratch
Step 1: Select a site for your shed that is level and free of debris. Clear the area of any tree stumps or rocks. The ground should be compacted and free of weeds and grass.
Step 2: Measure the distance between the ground and the bottom of your storage shed’s door opening. Use this measurement to determine the length of lumber you will need for each side of your ramp.
Step 3: Cut 2x4s to length using a circular saw with a carbide blade installed. Install 2x4s on opposite sides of your shed so that they extend past the door opening by at least 6 inches on each side. Attach them using deck screws or nails driven into pre-drilled pilot holes, being careful not to split the wood or overdrive them into place so they will not protrude through the front surface later on when we attach it to the shed door frame later on during this project. You can also use metal brackets instead if preferred but they are expensive so I will show you how to build one using only wood below in steps 4 through 8 once you have completed building this frame first as shown here in step 3 above as well
If you are looking for an easy-to-build ramp, then pallet racking is a great solution.
You can use it to create a wide variety of different types of things like furniture or garden sheds.
It will take some time and effort, but in the end you will have a sturdy and durable product that will last for years.
If you are not sure where to start, here are some tips on how to make your own pallet storage shed ramp.
Step 1 – Get the right materials
The first thing you need to do is gather all of the materials that you’ll need for this project. You will need:
A set of pallets (you can find them at any home improvement store)
Saw (for cutting down the pallets into smaller pieces)
Nails (for attaching the boards together)