How to build a storage shed: by Christina Bowden In this house, building a storage shed from scratch has proven its worth if only for the fact that I didn’t have to buy one from someone else. This job is simple, clean, and easy; I’m so in love with it!
This page isn’t getting much love. It needs a boost in order to get the word out on these shed building plans! Here is a staring guide, if you like to build shed foundation. The wood shed plans will provide you with a detailed step by step instructions that are easy and fun to follow. Even if you have never done it before and have no building experience, the shed building plans will show you where to start and how to finish your new shed.

How to build a storage shed foundation
Many DIYers choose to build their shed on a concrete slab. However, this isn’t the only way to go. You can also build it directly on the ground, as long as you have the right tools and materials. The best option ultimately depends on your budget, available time and skill level.
Here are some tips for building a storage shed from scratch:
Measure the size of your new shed. Add 10% to 15% to allow for any error in measurement or material shrinkage during construction.
Gather all of the necessary materials for your project, including lumber, nails and other hardware items like screws and hinges. If you’re using treated lumber, make sure it’s been pressure-treated at least nine months before cutting into it so that it will be safe for use in a structure like a storage shed where water may come into contact with the wood.
Build the frame using 2x4s or other structural lumber pieces cut to size based on your measurements from Step 1 above. Attach them together using nails or screws according to manufacturer recommendations (usually small screws). Use braces or diagonal boards between corners if necessary to add strength. If you’re building your shed on a concrete slab (below), skip down to Step 4 below
How to build a storage shed
The foundation is the most important part of any shed. A sturdy, well-constructed foundation will ensure that your shed will stand up against the elements. A poor foundation will lead to cracks, leaks and other structural problems.
Before beginning construction, be sure that you have all of the materials needed for your project. This includes lumber, nails, screws and other hardware as well as tools such as hammers, saws and drills. You may also want to consider using a power nail gun if you do not want to use handheld tools.
Once you have all of your materials in place, measure out your building site and mark out where you want each wall panel to go. Use stakes or other markers to outline the panels on the ground so that you know exactly where they need to go when it comes time for installation.
Now it’s time for digging! If there is already a foundation present at this location (or if there are existing walls), then skip ahead to Step 4 below; otherwise proceed with Step 2 below:
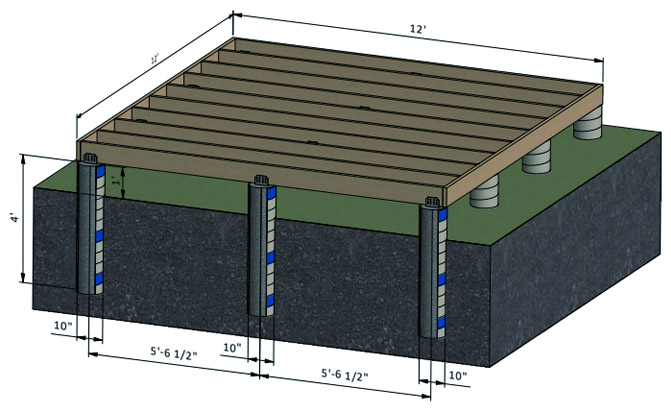
Dig holes for each post at least two feet deep (ideally deeper than two feet if possible). Make sure that each hole is wide enough so that it can accommodate both legs of each post without
A storage shed foundation is a great way to support your shed. A solid foundation will ensure that the shed does not shift or move and will increase its durability. A good foundation can also help protect the shed from termites, rodents and other pests.
The most important thing is to make sure that your shed can withstand any weather conditions that may occur on your property. The best place to build a storage shed is in an area that gets plenty of sunlight and has good drainage. It should be away from trees or other tall structures so that it does not get in the way of your lawn mower or other yard equipment.
The first step in building a storage shed is digging out the ground where you want to place the shed. You need to dig down at least 12 inches deep so that you have enough room for the concrete footings to rest on top of the dirt flooring below it. Once this is done, you can pour concrete down into each hole and allow it to harden before pouring more onto each hole until they are completely filled in with concrete all around where your foundation is going to be laid out around each hole’s perimeter by using some sort of string or tape measure as a guide for where
Before you begin building a storage shed, you need to prepare the location. The best thing you can do is build it on your own property so that it can’t be seen from the street. If you have to build it near the street, make sure it will be hidden by plants or other objects such as trees.
The next step is making sure that the ground is level and stable enough for the shed foundation. If there are rocks or roots protruding from the ground, remove them so they won’t damage your shed foundation or any other part of your structure later on.
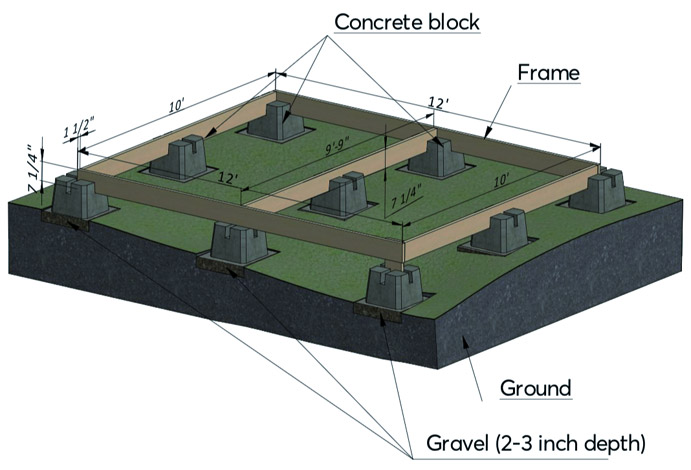
If you are building on concrete blocks or a slab, then you don’t need to do anything else besides preparing an area large enough to accommodate both structures together comfortably. However, if you’re building on dirt or grass, then you will need to dig out an area deep enough for installing a concrete foundation first before laying down any materials in place for your new shed.
For this project we will be using 4×4 treated posts as our base supports along with pressure treated 2x6s as our floor joists which will support both sides of our walls plus roof sections when we get there later on during construction stages of this project as well as
Sheds are great for storing tools, firewood and other items that you need to keep outside. Sheds come in a variety of sizes and styles, so it’s easy to find one that fits your needs. While you can buy pre-fabricated sheds, most people prefer to build their own shed because it’s cheaper and gives them more control over the design.
If you want to build your own shed from scratch, there are several important factors to consider before you begin construction.
Choose the Right Location
When choosing where to place your shed, think about how much space you need and how much sunlight the area receives. You’ll also want to make sure that the area is level and well-drained.
Build a Foundation
Once you’ve chosen an appropriate location for your shed, it’s time to start building a foundation. The first step is digging out the ground where the foundation will go. This process involves measuring the length and width of your planned structure so that it fits perfectly into the space available for it. Then dig out all dirt from this area until it reaches at least 8 inches deep or deeper if necessary due to excessive moisture levels (which can cause mold growth). Next, install a drainage system by laying down perforated
Here are some of the most common ways to build a storage shed, with instructions for how to build a storage shed from scratch and how to build a storage shed out of pallets.
Building a Storage Shed from Scratch
1. Find out what size you need. Measure the space where you want to place your storage shed, and then measure the length, width and height of the space. Add an extra foot on each side for clearance and stability.
2. Make sure that any area you’re planning on putting your shed has good drainage and plenty of sunlight. This will help keep it dry and prevent mold growth. You’ll also want to make sure that if water does get into the shed somehow, it drains away quickly so that no damage is done.
3. Lay out your base frame according to how big your finished shed will be (including any extra room for clearance). For example: If you have 2x4s laying around, use them as your “furring strips” (the pieces that support all the other wood). A 4×8 foot shed would require 24 furring strips running across its length (8×3 ft) and 12 furring strips running across its width (4×3 ft). Use nails or screws
How to Build a Storage Shed out of Pallets
A pallet is made up of a few boards that are nailed together. The wood usually comes from wood pallets, which are used for shipping goods. A pallet can be disassembled and used in many ways, such as making furniture and sheds.
To build a shed out of pallets you will need:
Pallets
Tools: Hammer, screwdriver and saw
Building materials such as nails and screws
Building a shed out of pallets is an easy and inexpensive way to store your tools, lawn equipment, or just about anything else you want to keep outside. It’s also a great way to add some character to your yard.
Here’s how to build a shed with pallets:
Find some pallets. You can get them from any business that ships goods. The best ones are the flat ones made of wood and have the most support between the boards. Make sure they’re not too old or damaged because they may not be safe to use.
Lay out the pallets on your site and decide how big you want your shed to be. Measure from end to end and then cut all of them (except for one) in half so that each section will fit into place and create a frame when joined together with nails or screws. Cut as many as needed so that you have at least two extra pieces for each side, front, back and top so that there’s plenty of overlap when joining them together with nails or screws. You’ll also need some extra pieces for door frames if you’re going to make doors for your shed; otherwise it’ll be open-air storage!
Join the pieces together with either nails
Step 1: Plan the design of your shed. Sketch out a plan for your shed, including the size and dimensions, as well as the location of any doors and windows. You can use a simple drawing program on your computer, or you can create a scaled-down version using graph paper.
Step 2: Cut the pallets apart. Use a saw to cut the pallets into individual boards that are 8 feet long and 3 inches wide.
Step 3: Place the boards in rows to form walls and flooring for your shed. In order to create a strong structure, make sure to stagger the boards so that they overlap each other by at least 1 inch (2.54 cm). Use nails or screws to secure them together at each joint.
Step 4: Repeat this step until you have completed one side of your shed’s frame by placing two rows of boards against each other (one on top of another). Repeat this process with all four sides until all pieces are used up.
Step 5: Place another row of boards on top of two previously installed rows so that they do not overlap with one another; instead, leave an empty space between them measured at least 6 inches (15 cm) wide on either side (top and bottom rows). The
How to Build a Storage Shed, Step by Step.
1. Determine the size of your shed, and purchase the necessary materials.
2. Lay out the base frame and secure it together with 2x4s or 4x4s.
3. Lay down sheets of plywood or OSB (oriented strand board), and attach them to the frame with screws or nails.
4. Install a base layer of plywood siding, using exterior-grade deck screws to secure it in place on each joist and stud.
5. Attach second layer siding over first layer at a 45-degree angle so that each piece overlaps its neighbors by at least 4 inches all around the building perimeter.