Building a storage chest can be a really useful DIY project. Whether you’re using it for some extra storage in your garage or as a coffee table for your patio, making a chest is a smart way to use the skills that you’ve learned and turn them into something that you can cherish for years to come. Here are some tips on how to build an outdoor storage chest, as well as building an indoor storage chest if you want to get started right away.
A homemade wooden chest is an ideal place to store your patio cushions, blankets and other outdoor accessories. Construct the chest out of cedar or another wood that resists rotting. By building this storage chest yourself, you’ll save money over a store-bought storage unit.
How to build a storage chest
There are a number of ways to build a storage chest. You can build it out of wood or metal, depending on the type you want to create. The simplest type is made from plywood and has no moving parts. It is also the least expensive option.
You may also want a storage chest that has drawers or shelves inside it, which will make it easier to organize your tools and supplies. You can use this type of chest in many different locations around the home, including in the garage or workshop.
If you are planning to build an outdoor storage chest, there are some things that you need to think about before you start building it. Your first step is to decide where it will be located and what type of material you want to use for its construction.
This article will show you how to build an outdoor storage chest from scratch with simple materials that are available at any hardware store or home improvement center.
Storage chests are designed to keep your items safe and organized. The best way to make a storage chest is with cedar, but you can also use pine or other woods. Cedar is more expensive than pine, but it lasts longer and resists moisture better. If you have any doubts about the durability of the wood in your area, choose cedar or another more durable wood.
The first step in building a storage chest is cutting all the pieces to size. This will require measuring and marking each piece with a pencil before cutting them out with a saw. Sanding down all the surfaces after cutting them will remove any splinters or rough spots from being cut by hand or power saws.
Paint or stain your wood however you like before assembling it into a box shape on its bottom side. Attach corner braces onto every side except for one so that it becomes rigid enough for moving around without falling apart. Add hinges to this last open side so that it can be opened up when you need access inside of your storage chest.
Add handles on both sides (or sides if there are only two) so that you can lift up or move around easily when necessary without having to break anything else in
You can build your own storage chest in just a few hours. This chest is made from 3/4-inch plywood, but you could use any thickness you like. You’ll need a jigsaw and a drill with a 1/2-inch bit to make the holes for the drawers.
Cut the pieces
The bottom piece should be 36 inches square, with rounded edges on all sides. The sides are each 20 inches tall and 10 inches wide at the bottom (add 2 inches for the thickness of your plywood). The front and back have flaps that are 6 inches wide at the top and 4 inches wide at the bottom (add 2 inches for your plywood). Cut these pieces out with a jigsaw or circular saw.
Assemble it!
Lay out all four sides on your work surface so they’re equal distances apart from one another, then put them together with 2 1/2-inch screws. Make sure they’re aligned properly so they don’t wobble when you put weight in them. Then add the top piece to cover everything up so it looks like one big box with nothing showing through. Screw it into place using 2 1/2-inch screws driven into predrilled holes on
If you are looking for a useful and decorative piece of furniture, you can make a simple storage chest. This project is easy to do and will give years of service.
This article will show you how to build a small storage chest. A small chest can be used as an end table or nightstand in the bedroom or living room.
A large chest is also very useful in the garage or basement to store tools, clothing, linens and other items.
The materials needed for this project are:
3/4″ plywood (A) – 2′ x 4′ sheet if using cedar; 3/4″ pine plywood is fine if using pine or poplar
2 1/2″ finish nails (B) – around 100
Wood glue (C) – around 1 oz
Finishing nails (D) – around 10-12 for attaching handles; 3-4 for joining sides together; 1-2 for attaching hinges
First, let’s take a look at the materials you’ll need to build the chest. You will need:
1 sheet of plywood (the size will depend on how big you want your chest to be)
4 hinges
4 flat-head wood screws
4 lockable latches
How to build an outdoor storage chest. I had a small spot in my backyard that was just perfect for a little garden shed. The only thing was, it didn’t exist. So I decided to build one. It turned out great!
I decided to use cedar fence boards from the local home improvement store for the sides of the shed. They were already pre-cut and sanded, so all I had to do was put them together with some nails and screws.
My wife wanted it to look nice, so we stained it with a dark stain that looks good with the cedar boards. We also used some trim around the top edges of the shed so they would look even nicer when stained or painted.
This project only took me about two hours because there were no complicated cuts or joints involved (other than nailing together pieces of wood).
How to build an outdoor storage chest
A simple and sturdy outdoor storage chest is a great way to store your tools and equipment. The box can be made with plywood and lumber and assembled with screws. This type of project is very easy to make, even for beginners.
The first step in building the outdoor storage chest is cutting all the pieces to size. You’ll need two pieces of 3/4-inch plywood for the sides, top and bottom of your box; three pieces of 1-inch by 2-inch lumber for the front, back and bottom of each side; four pieces of 1-inch by 4-inch lumber for the top lip; and two pieces of 1-inch by 2-inch lumber for the sides’ corners.
After you’ve cut everything to size, attach the front piece to both ends of one side piece using screws or nails. Then attach the rear piece to one end of that same side piece. Continue doing this until all four sides are attached together at their corners using screws or nails.
Next, attach the top lip boards across each side board so they rest on top of the rear board at each corner where they meet up with another side board. Attach these boards using screws or nails followed by attaching them

This is a very simple project that anyone can do. All you need is a few tools, some wood and some paint.
Here are the steps:
1. Cut the boards to size. Make sure the bottom of your box is square so it will sit flat and not wobble. The top should be 1 inch shorter than the bottom to allow for the lid.
2. Attach the sides together using screws and glue. I used 3/4 inch plywood for my sides, but you can use whatever you have on hand as long as it’s strong enough to hold up your belongings inside.
3. Attach the bottom piece of plywood to the outside of your box using screws and glue (or nails if you prefer). This will give it more strength and keep everything together while adding some style to your project! You can also use 2 by 4s or 2 by 6s too if you want something thicker than plywood but still lightweight enough to move around easily when needed!
Build a storage chest with a lid that lifts up and down. The construction is simple and the design is very versatile. You can build this chest in any size you like. The lid can be used to store items or it can act as a seat when you need it. This chest is ideal for storing items on your patio, at the beach or by the poolside.
The materials needed include some 1x4s, 2x4s and plywood. You will also need screws and nails, glue and paint if you want to give your outdoor storage chest a nice finish.
The first step is to cut all of your lumber into pieces using a table saw or circular saw. To make things easier, use a square ruler so that all of your cuts are perfectly straight lines.
Step 1: Cut the pieces.
Measure and mark the board for the lid. The lid will be larger than the base, because it needs to accommodate the rim and handles.
Mark and cut two pieces of wood to make up the sides of your chest and two more to make up its base. For this project you’ll need four pieces of plywood that measure 1/8 inch thick by 8 inches wide by 36 inches long, as well as eight strips that measure 3/4 inch thick by 3 inches wide by 36 inches long.
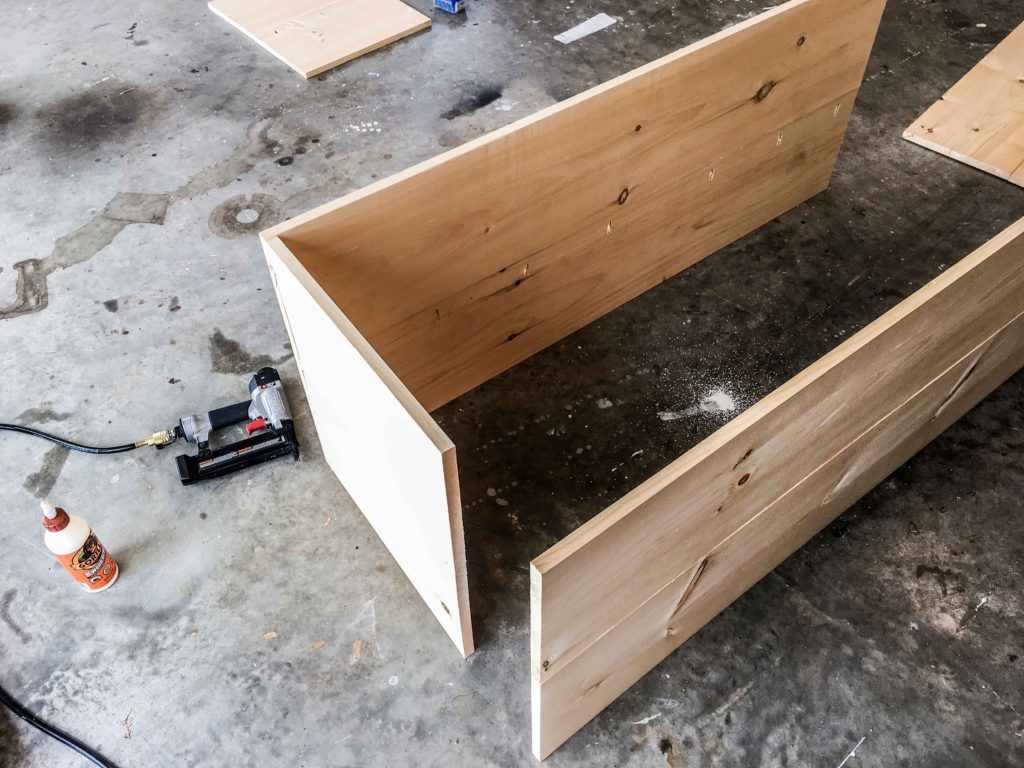
Step 2: Attach the sides.
Using glue and nails or screws, attach one side piece to each end of each long piece of plywood using a clamp or C-clamps to hold them together as you nail or screw them together. If you don’t have clamps, secure them with tape until they dry completely.