If you love the look of a stone walkway, but would like something less time consuming and expensive, we have the answer. Learn how to build a crushed stone walkway with our easy step-by-step process.
Building a walkway is one of the more basic projects you can tackle as a do-it-yourself homeowner. In fact, anyone with a few basic plumbing and carpentry skills can build this basic walkway using only hand tools and a circular saw.
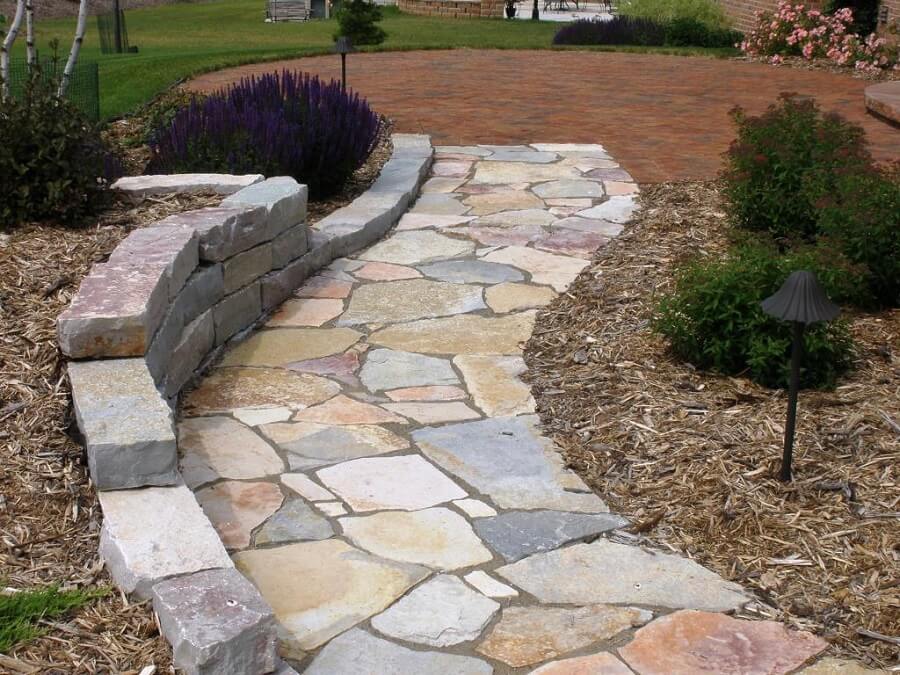
How to build a stone walkway
The best way to build a crushed stone walkway is by using the drystack method. This involves laying down a bed of gravel, then placing stones on top of the gravel. The stones are held in place by their own weight, and the gravel holds them in place from underneath.
This method is relatively easy and inexpensive because you don’t need to use cement or mortar to hold your stones together. However, it can be time consuming if you’re working alone or with just one other person. You’ll also have to spend some time cleaning up after yourself because there will be some loose gravel left over after building your walkway.
Another option for building your walkway is by using concrete blocks instead of stone. These blocks can be used both indoors and outdoors, but they’re more expensive than regular stones and require more work to install them properly. They also take longer to set up than drystack methods do because they require cement or mortar to hold them together
If you have a small area to cover, it’s possible to install a walkway made of crushed stone on your own. Crushed stone is available at any home improvement store, and the installation process can be done in several days.
Crushed stone walkways are relatively inexpensive and easy to install. They’re also permanent, so there’s no need to worry about keeping them clean and free of debris.
Step 1: Determine the size and shape of the walkway
Step 2: Lay out the stones
Step 3: Cover with gravel or sand
Step 4: Apply a sealant
The best way to build a stone walkway is to use concrete stones. Concrete is easy to work with and forms a strong bond with the stone. You can also mix in some sand or gravel with the concrete, if you want a more natural look.

Step 1 – Prepare the Site
Start by getting rid of any weeds or grass in the area where you will be building your walkway. Do this by raking or pulling them up by hand. If you have any trees or shrubs growing near your site, it’s best to trim back the roots so they don’t interfere with how level you need to make your walkway surface. You’ll also want to remove any debris like rocks and dirt from this area before starting construction of your walkway.
Step 2 – Mark Out Your Design
Use chalk or spray paint to mark out where each stone will go on your design grid. It’s important that all of these lines are straight so that everything fits together properly when finished! It’s also helpful if you mark out where each edge of each stone will be so there aren’t any gaps between them when finished because that would look sloppy!
Step 3 – Dig Holes for Each Stone
If you’ve ever visited a historical site and walked down the stone-paved streets, you know how beautiful and timeless they can look. Stone walks can also be an attractive addition to your own yard, and they’re easy to create with just a little bit of work.
Planning Your Walkway
When planning your stone walkway, the first thing to consider is where it will lead. You’ll want to think about how far you’ll need to walk on the stones (and how often) when deciding whether or not they’re appropriate for your project.
If you are planning a rectangular or oval design with curving corners, keep in mind that it will be more difficult (and expensive) to cut rounded edges than flat ones. Curved paths are best suited for straight-shot paths where people will spend minimal time walking on them.
If you are working with irregular shapes like circles or triangles, you may find it easier to use pavers instead of crushed stone for your walkway. Pavers come in all different shapes and sizes and can be arranged in any pattern imaginable without having to worry about creating rounded edges or corners. They are also less likely than gravel or sand to shift around over time when exposed
The stones for a walkway should be the same height, but they don’t have to be the same size. The stone base will be about 4 inches high and 12 inches wide, with each stone being about 2 to 3 inches thick. Use a level to make sure each stone is level with the others before you place it in position.
Lay out your stones in rows, starting with the first row and working toward the end of your walkway. Leave about 6 inches between rows so you have room for drainage and expansion. Spread soil between each stone and tamp it down firmly so that no puddles form when it rains. Place another layer of crushed rock over this area (or whatever type of stone you chose) to create another 6-inch layer between your walkway and the lawn.
A crushed stone walkway is a great way to add an attractive accent to your landscape. This type of walkway can be used in conjunction with pavers, paver stones or even concrete to create a unique look. It’s also a great choice for areas where grass does not thrive or where drainage is poor.
Build the Foundation
Before you start building your crushed stone walkway, you need to lay down some sort of foundation. If you’re using a retaining wall as part of your project, then this step is already done for you. If not, then consider using pressure-treated wood stakes to hold down the edges of your walkway as you build it. This will provide extra support and help keep everything level and sturdy as you go.
Place the Crushed Stone
After marking off where your walkway will be located, set out some stakes along the perimeter of where it will go so that you can easily place each layer of crushed stone in place before moving onto the next one. You’ll want about 8 inches between each layer so that there’s enough room for water drainage when it rains or snows outside. If there are any areas where grass or plants may grow up through the cracks in between layers, then use sharp rocks or
How to Build a Crushed Stone Walkway
A walkway is a great way to add value and beauty to any home. A walkway doesn’t have to be elaborate or expensive, but it does need to be functional, durable and attractive. The easiest way to build a walkway is with crushed stone.
Crushed stone comes in different sizes. You can buy crushed rock in bulk or by the bag at most landscaping supply stores and garden centers. If you’re building a large walkway, it may be easier to buy the larger rocks rather than trying to break them down yourself.
You can also use smaller stones as edging around flower beds or other landscape features.
If your goal is simply to create an attractive path through your yard, then you may want to consider using no edging at all — just fill in with dirt between the stones in order to prevent weeds from growing up through the cracks between them.
Materials for Building a Walkway
The materials required for building a walkway include crushed stone, sand and cement mix (or concrete), plus any decorative items such as bricks or stones that you want incorporated into your design. You’ll also need tools such as shovels, rakes and wheelbarrows;
Over the years, we have had many customers ask us how to build a paver stone walkway. Whether they’re looking for a DIY project or they want to save money by hiring someone, we are happy to help. Here are a few tips that can help you build your own walkway:
1. Determine the size of your walkway
2. Find the right materials
3. Lay out your stones in an attractive pattern
4. Create a border around your walkway with mulch or gravel
Crushed stone walkways are a popular choice for patios and gardens. They’re easy to install and require minimal maintenance. The crushed stones can also be used to create pathways, playgrounds and driveways.
If you’re new to building walkways with crushed stone, here’s how it’s done:
1. Excavate the area where you’ll build your walkway. Remove any existing vegetation or topsoil that is more than 6 inches deep. If the existing ground is made up of small rocks or gravel, leave them in place because they will help anchor the new stone walkway.
2. Lay out stakes at each end of the proposed path location and stretch mason’s string between them at intervals of 10 feet (3 meters). This will give you an accurate layout as well as help keep track of where you’ve placed each row of stones on the ground surface during installation.
3. Spread a layer of mortar on top of the ground where you want to put down crushed stone for your new walkway project (or driveway). Add about 1 inch (2 1/2 centimeters) of mortar for every 10 square feet (1 square meter) of area being covered with crushed stone pieces.[1]
When you’re ready to build your walkway, you will need to decide what type of material you want to use. There are many options to choose from, including brick, stone and concrete. The problem with brick is that it requires a lot of maintenance, as it can crack and break easily. Stone is another option, but it’s difficult to find stone in the right size and shape for walkways. Concrete is the most popular choice when it comes to building walks because it’s durable and easy to maintain.
One of the biggest advantages that concrete has over other materials is that it can be poured into molds with very precise dimensions. This allows you to create beautiful curbs and gutters that fit together perfectly without any gaps or joints where water can collect and cause damage. When installing a concrete walkway, you should always make sure that there are no cracks or gaps along the edges where water could pool up after a rainstorm or snow melt.